How to work with EHANDBOOK-NAVIGATOR
Creating an EHANDBOOK Project
An EHANDBOOK Project can contain one or more containers. The created project
is saved as .ehbp format.
To create a new EHANDBOOK project:
-
Load one or more containers. Refer to Loading an EHANDBOOK File or Project and Supporting of Multiple EHANDBOOK Files
-
Go to the File menu and click Save As… (<CTRL+SHIFT+S>).
Save Aswindow is displayed. -
Enter the name for an EHANDBOOK project.
An EHANDBOOK project is created with <filename>.ehbpformat.
|
While creating a project, only the Windows valid special characters are allowed. It means that the characters like \, /, :, , ?, ", <, >, and | are not allowed. |
Loading an EHANDBOOK File or Project
An EHANDBOOK file contains documentation information such as text, structures and interactive models that you access using EHANDBOOK-NAVIGATOR.
To load an EHANDBOOK Container or a project:
-
On the
Filemenu, selectOpen.
Select Filedialog box is displayed. -
Select EHANDBOOK container (
.ehb), or EHANDBOOK project (.ehbp), or encrypted EHANDBOOK container (.ehbcrypt) and clickOpen.
<Or> -
Click Open icon in the toolbar.
Select Filedialog box is displayed. -
Select EHANDBOOK container (
.ehb), or EHANDBOOK project (.ehbp), or encrypted EHANDBOOK container (.ehbcrypt) and clickOpen.
<Or> -
Press
<CTRL+O>.
Select Filedialog box is displayed. -
Select EHANDBOOK container (
.ehb), or EHANDBOOK project (.ehbp), or encrypted EHANDBOOK container (.ehbcrypt) and clickOpen.
<Or> -
Double-click on an EHANDBOOK container (
.ehb), or EHANDBOOK project (.ehbp), or encrypted EHANDBOOK container (.ehbcrypt) from the File Explorer Loading an EHANDBOOK File or Project Through File Explorer.
Loading an EHANDBOOK File or Project Through File Explorer
While opening a container (.ehb file) from the File Explorer and if any of an
EHANDBOOK file or a project (.ehbp) was loaded already, then
OpenEHANDBOOK File dialog box displays.

It asks you whether you want to open only the selected container or it needs to
be added to the currently loaded file or a project.
When you click Open, it closes the already opened file/project and opens the
selected file/project.
When you click Add to Project, then Manage EHANDBOOK Project displays.
Click OK to add the file to the currently opened EHANDBOOK file/project. Refer to Supporting of Multiple EHANDBOOK Files for more details on manage EHANDBOOK project.
Loading Multiple EHANDBOOK Files Through File Explorer
EHANDBOOK-NAVIGATOR allows you to select multiple EHANDBOOK files by holding <Ctrl> key in the File Explorer and opens those files in it. When multiple files
are selected, EHANDBOOK-NAVIGATOR displays Open EHANDBOOK files dialog
box and offers you to create either a new project or add those files to the currently opened project.
When you click Create new Project, it closes the already opened file or a project
and displays Manage EHANDBOOK Project dialog box. Click OK to create a new
project.
When you click Add to Project, then Manage EHANDBOOK Project displays.
Click OK to add those files along with the files in the currently opened
EHANDBOOK project.
Refer to Supporting of Multiple EHANDBOOK Files for more details on manage EHANDBOOK project.
|
By default, EHANDBOOK-NAVIGATOR displays the list of 5 EHANDBOOK files/projects which were loaded previously. The count can be changed in the Preference page. The last loaded container is listed at the top. |
NOTICE
Container content may have been changed externally while viewing the container in the EHANDBOOK-NAVIGATOR!
The container format is an open format, where XML files are grouped in a ZIP archive. The XML files can be changed although the container is in use.
Affected container contents will be changed or displayed incorrectly in the EHANDBOOK-NAVIGATOR. The following information can be affected when changing the source files:
-
documentation texts
-
documentation structure
-
interactive models
Therefore, always check the container in the EHANDBOOK-NAVIGATOR for wrong, missing or incomplete content by validating that the container content corresponds to the ECU documentation source before you start working.
Before working with a container:
-
Open the container in the EHANDBOOK-NAVIGATOR.
-
Validate that the content of the container corresponds to the ECU documentation source.
-
If you find model deviations, wrong, missing or incomplete content, contact the producer of the container to fix this errors.
Loading an A2L File
The EHANDBOOK-NAVIGATOR allows to load an A2L file and generates an EHANDBOOK container. An A2L file should comply with ASAM standard and it should have the valid Functions.
Functions
EHANDBOOK-NAVIGATOR uses functions to structure the contents in the table of contents (TOC) and provides a graphical visualization of their dependencies.

Loading an A2L file
To load an A2L file:
-
On the File menu, select
Convert A2L file….
Convert A2L file to EHANDBOOK containerdialog box is displayed.
Convert A2L file to EHANDBOOK container dialog box.
-
A2L file selection
-
A2L file encoding conversion options
-
Specify the location and name of the container
-
Checkbox to generate images
-
Convert A2L file
-
Select the previously loaded A2L file from the "Select A2L file" drop-down menu or click
Browseto select it. -
After selecting an A2L file the encoding of the content is placed in the drop-down menu. By default, the highest encoding confidence level (e.g. ISO-8859-1) is pre-selected. If the encoding is not known or it is not consistent for the whole file then choose Detect automatically (2).
-
Select or type the location to generate the EHANDBOOK container or click
Browseto select the different file.
By default, the location is selected where the A2L file exists and the name of the A2L is considered as the container name with.ehbextension. You can change the name of the container by editing it in the text box (3). -
Check the checkbox (4) to generate the images for functions.
Please note that this takes several time to generate the images. By default, the checkbox is unselected. -
Click
Convert A2L file. If the same name already exists in the specified path, then EHANDBOOK- NAVIGATOR prompts either to change the location or overwrite the file. An A2L file converts it into an EHANDBOOK container. Please note that it takes few minutes to convert it. The progress bar is displayed. -
Once the file is converted, a dialog box is displayed as shown below.
-
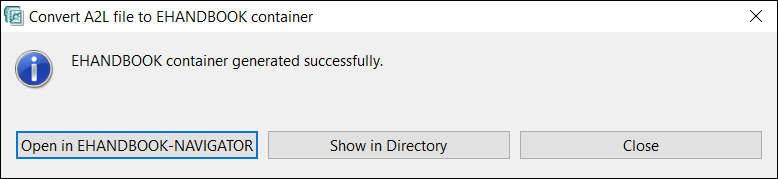
Dialog box:
-
Click
Open in EHANDBOOK-NAVIGATOR.
It opens the generated container in the EHANDBOOK-NAVIGATOR.
<Or> -
Click
Show in Directory.
It locates the file in the File System.
<Or> ClickClose.
It closes the dialog box.
The progress bar is displayed which displays the loading status.
-
Images generated for functions
-
Images are not generated for functions
When you check the checkbox to generate images for functions, the images are
generated which helps to visulaize the preview of the images before opening
itself, but it takes some time to generate the images during A2L conversion. You
can open the functions by clicking Open function overview.
|
EHANDBOOK-NAVIGATOR converts to a container only for the valid A2L file. |
Saving
Save feature helps to save all the changes made in the EHANDBOOK container
(.ehb), or EHANDBOOK project (.ehbp), or encrypted EHANDBOOK container
(.ehbcrypt).
To save an EHANDBOOK container, or EHANDBOOK project, or encrypted EHANDBOOK container:
-
Load one or more containers. Refer to Loading an EHANDBOOK File or Project and Supporting of Multiple EHANDBOOK Files .
-
On the
Filemenu clickSave… (<CTRL+S>).
<Or> -
Click
Savebutton in the toolbar.
This saves all the modified changes in the EHANDBOOK container, or EHANDBOOK project, or encrypted EHANDBOOK container.
Save As
Save As… feature helps to save a copy of the current EHANDBOOK container
(.ehb) or EHANDBOOK project (.ehbp) with the new name.
To save an EHANDBOOK container, or EHANDBOOK project, or encrypted
EHANDBOOK container with the new name:
-
Go to
Filemenu, and clickSave As…(<CTRL+SHIFT+S>).
A windows explorer is displayed. -
Specify the new name and the location to save it.
A container can also be saved as an EHANDBOOK project (*.ehbp format).
Exporting to PDF
This feature helps to export the contents of a particular functional component
(FC) to a PDF document.
To export to PDF :
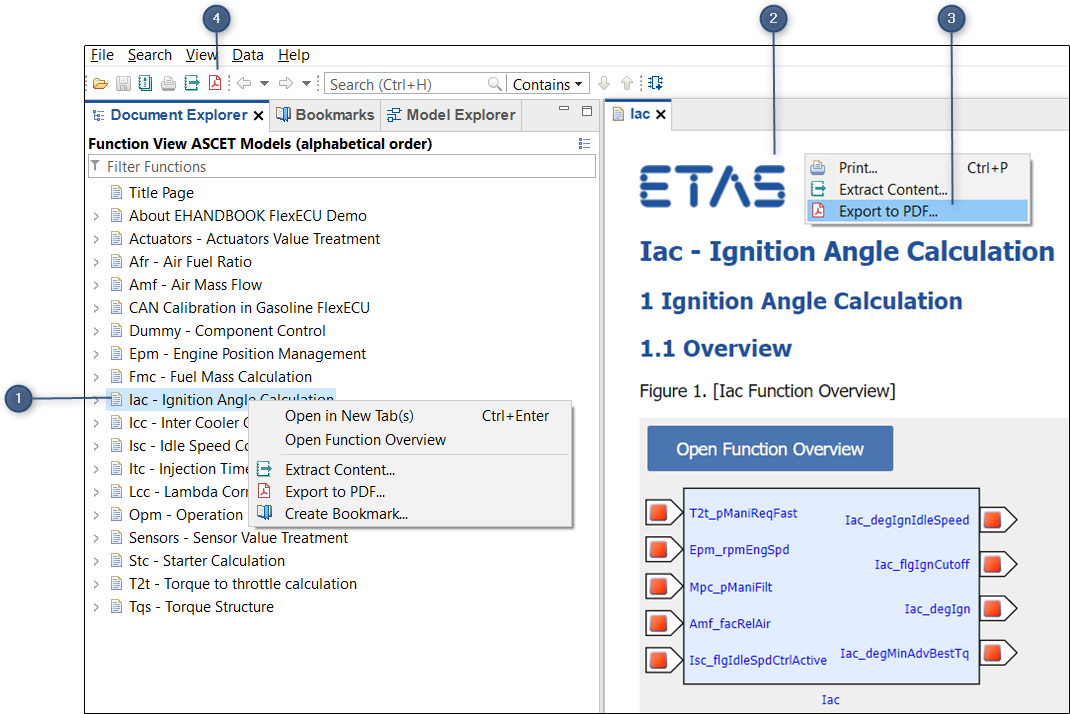
Export to PDF.
-
FC in Document Explorer
-
FC in Document Viewer
-
Context Menu
-
Export to PDF toolbar icon
Perform one of the following steps:
-
In the
Document Explorer, right-click on the required functional component (FC).
<Or> -
Right-click in the
Document Viewer.
A context menu is displayed.
-
Click
Export to PDF…. -
In the
Export to PDFdialog box, select the location, specify the file name and clickSave.
Please note that depending on the size of the contents it takes few minutes to generate the pdf file. -
Once the file is exported, a dialog box is displayed as shown below.
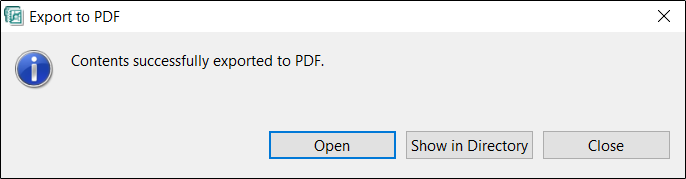
Dialog box:
-
Click
Open
It opens the exported file in a PDF viewer.
<Or>
ClickShow in Directory.
It locates the file in the File System.
<Or>
ClickClose.
It closes the dialog box.
Export to PDF can also be perfomed by clicking in the toolbar or
from the
in the toolbar or
from the Filemenu.
|
Exporting contents of multiple functional components to a PDF document is not possible. |
Exporting Log Files
Log files record the operations that are performed by you when using EHANDBOOK-NAVIGATOR. If there is an issue with the functioning of EHANDBOOK-NAVIGATOR, the information stored in these log files assist the support team in diagnosing the issue you are facing. EHANDBOOK-NAVIGATOR allows you to export the log files into a zip file. The zip file will contain the necessary log files and the relevant system information.
|
Changing the file name of the zip file is not recommended. |
To export the log files:
-
On the
Helpmenu, selectExport Log Files….
Save Asdialog box is displayed. -
Select the location for saving the zip file and click
Save.
The zip file is saved in the location specified. -
Mail the zip file to ETAS support, specific to your location, with a synopsis of the issue you are facing.
Supporting of Multiple EHANDBOOK Files
EHANDBOOK-NAVIGATOR supports to load and combine multiple EHANDBOOK files. In order to work with EHANDBOOK-NAVIGATOR easily with all the content, more than one EHANDBOOK container can be added to an EHANDBOOK project.
Creating or Modifying an EHANDBOOK Project
Manage Project feature in the File menu helps you to load one or more EHANDBOOK containers.
|
It is also possible to load a single EHANDBOOK container even before creating a
project by clicking on Open icon on the toolbar or by pressing |
To load the container(s):
-
On the File menu, click
Manage Project…
<Or> -
Click
 on the toolbar.
Manage EHANDBOOK Projectdialog box is displayed. -
Click
Add EHANDBOOK File(s)… -
Select EHANDBOOK File windowis opened to select the EHANDBOOK file (s). -
Select the file(s) which is(are) of
.ehbor.ehbcryptextensions. You can choose one or more file at a time. -
Click
Opento load the selected file(s). -
The selected file(s) are displayed in the
Manage EHANDBOOK Projectdialog box
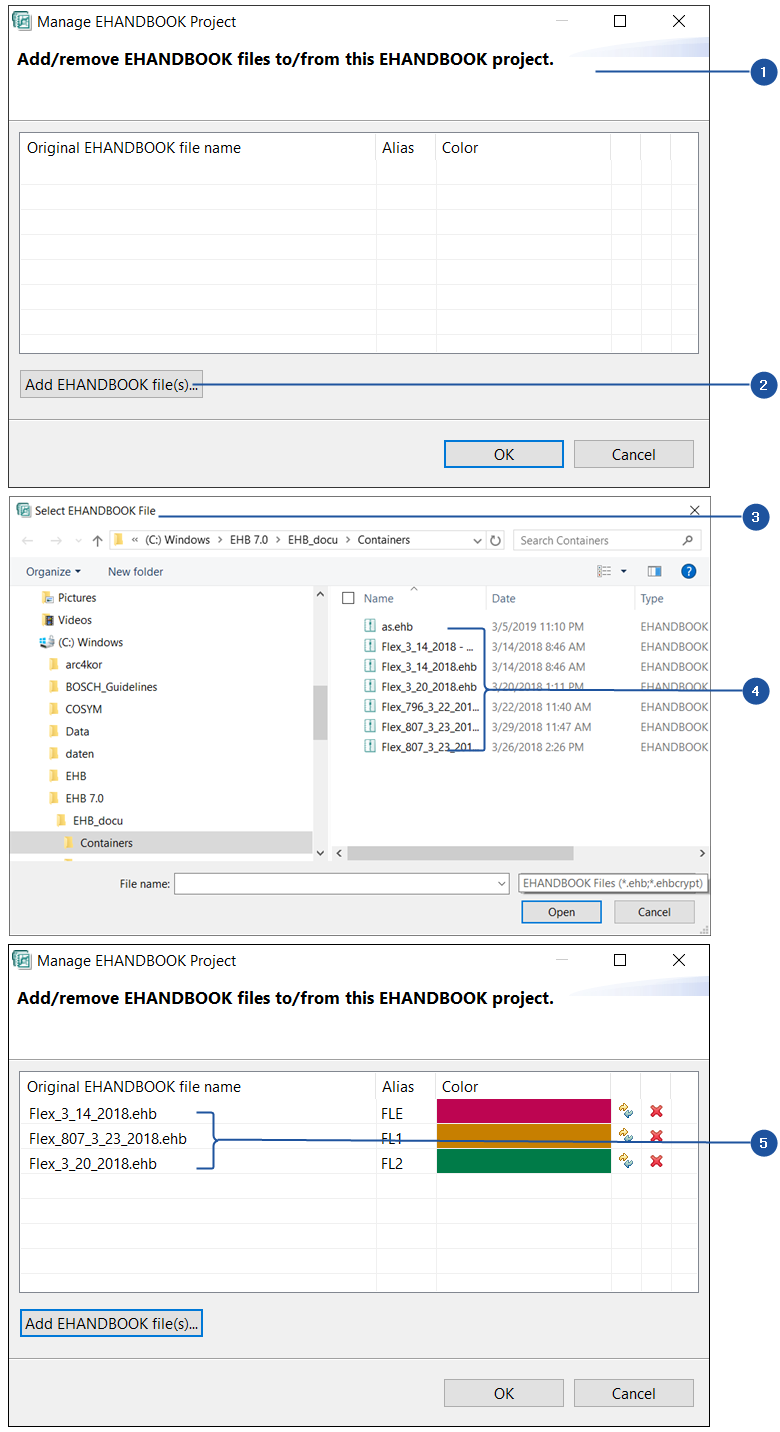
-
Manage EHANDBOOK Project dialog box
-
Add the EHANDBOOK files
-
Select EHANDBOOK File dialog box
-
EHANDBOOK files selection
-
Selected EHANDBOOK files in the Manage EHANDBOOK Project dialog box
Operations in the Manage Project Dialog
You can perform the following operations in the Manage EHANDBOOK Project
dialog box:
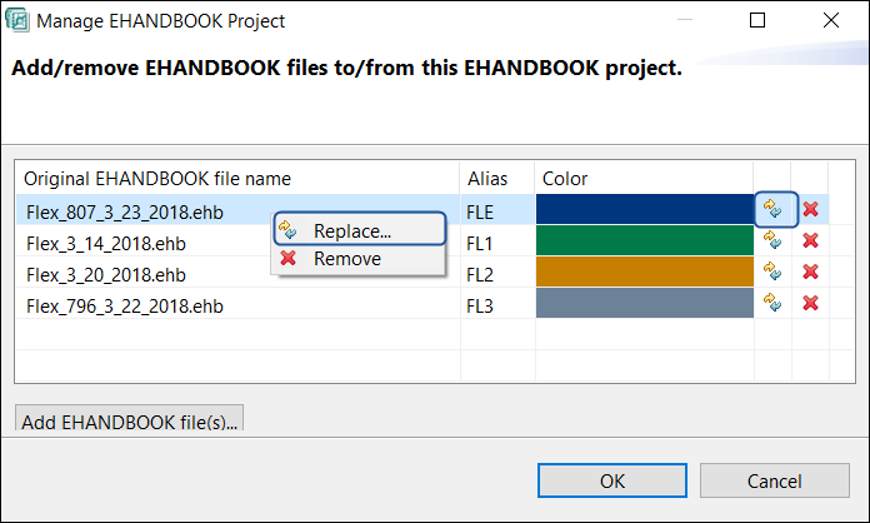
Replace EHANDBOOK file in a project
This is used to replace the selected EHANDBOOK file with the new one.
To replace the EHANDBOOK file, follow the steps below:
-
On the File menu, click
Manage Project…
Manage EHANDBOOK Projectdialog box is displayed. -
Select the file and click
 .
.
<Or> -
Select the file and right-click.
A context menu is displayed. -
Click

-
Select EHANDBOOK Filewindow is opened to select the EHANDBOOK file
(s). -
Browse and select the EHANDBOOK file.
-
Click Open.
The selected file will be replaced.
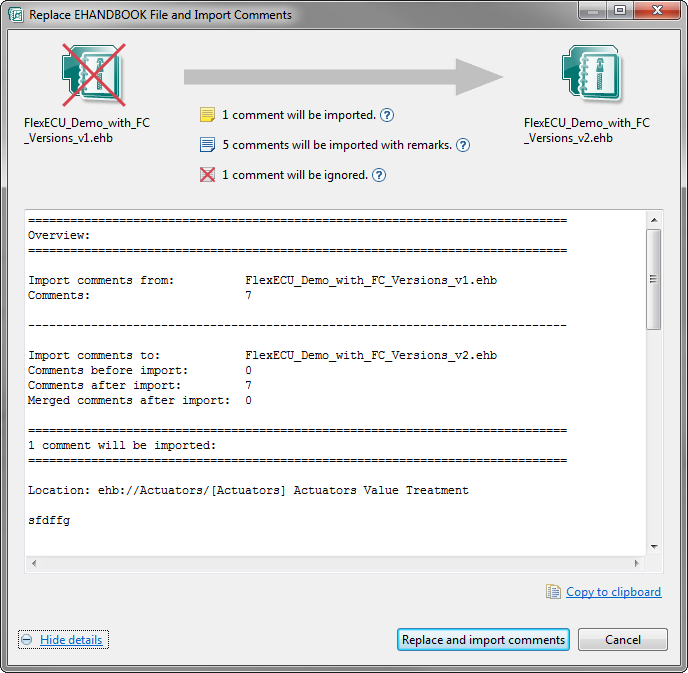
In few cases, if you are replacing a file which has comments in it, then Replace EHANDBOOK File and Import Comments
dialog box displays. Click Replace and import comments.
The comments which are present in the old file will also be
imported into a new file.
When a file is replaced with a new one, the defined alias name and color of the old file will be retained for the new one. Even the position of the new file in the table is same as the old file.
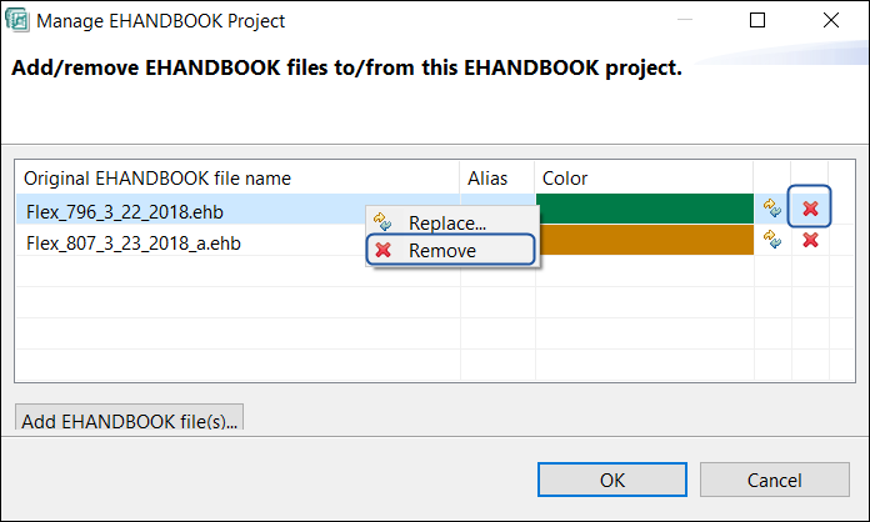
Remove EHANDBOOK file from a project
This is used to delete the selected file(s). To remove the EHANDBOOK file, follow the steps below:
-
On the
Filemenu, clickManage Project.
Manage EHANDBOOK Projectdialog box is displayed. -
Select the file and click
 .
.
<Or> -
Select the file and right-click.
-
A context menu is displayed.
Click .
. -
The selected file will be removed from an EHANDBOOK project.
|
In case, the selected container has the comments in it, then a confirmation dialog box is displayed. You can check and delete it. |
Alias names and change color in the Manage EHANDBOOK Project dialog
EHANDBOOK-NAVIGATOR allows you to define the alias names in the Manage EHANDBOOK Project dialog box.
You can also change the color of the flag.
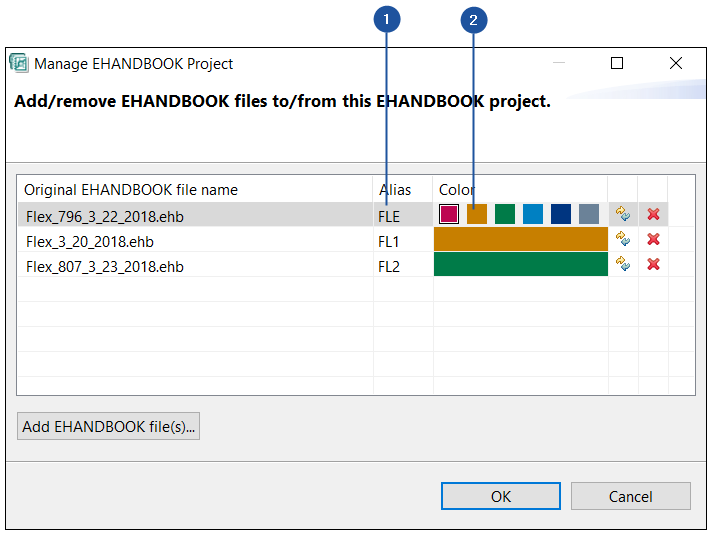
-
Defining the alias name of the file
-
Changing the color of the file
Define the alias names of the EHANDBOOK file
The Alias name of the EHANDBOOK file contains minimum of 2 characters and
maximum of 5 characters. The characters must contain either the upper case
characters (A to Z) or numbers (0 to 9) or the combination of both. The Alias
name should be unique.
To define the alias names, follow the steps below:
-
Click on the
Aliascell in the dialog box and change the name.
The changed name is updated.
Change the color flag of the EHANDBOOK file Follow the steps to change the color flag of the EHANDBOOK file.
-
Click on the "Color" cell of the container.
The predefined colors are displayed. -
Choose any of the predefined color.
The selected color is assigned for that particular file.
Inspect EHANDBOOK Container-Build version The column "Container-Build" contains the version of Container-Build which was used to create the EHANDBOOK file.
Working with Multiple EHANDBOOK Files
When you are working with a multiple EHANDBOOK files, it is difficult to identify
the information or documentation contents which are displayed in the Document
viewer originated from. EHANDBOOK-NAVIGATOR offers a solution by giving the
variant colored flags and the alias names to each container.
The usage of colored flags and the alias names in EHANDBOOK-NAVIGATOR are
stated below:
-
Displays alias names as well as the assigned color flag for different EHANDBOOK file in the table of contents (TOC). The functions of all the file are aggregated together in the "All Functions" in the Document Explorer.
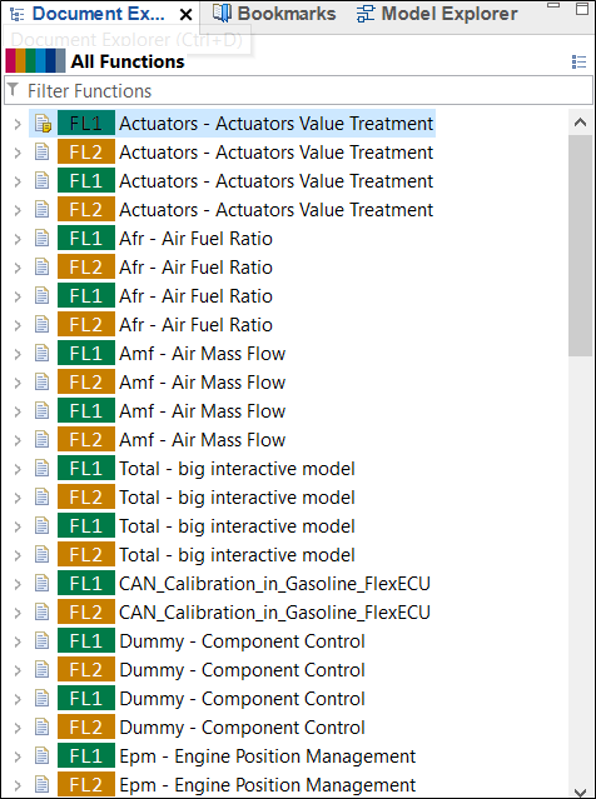
-
The tabs of the Document Viewer and Model Viewer display their assigned color flag and alias names as well.

-
Search proposals show colored flags and alias names to indicate the source of the displayed information.
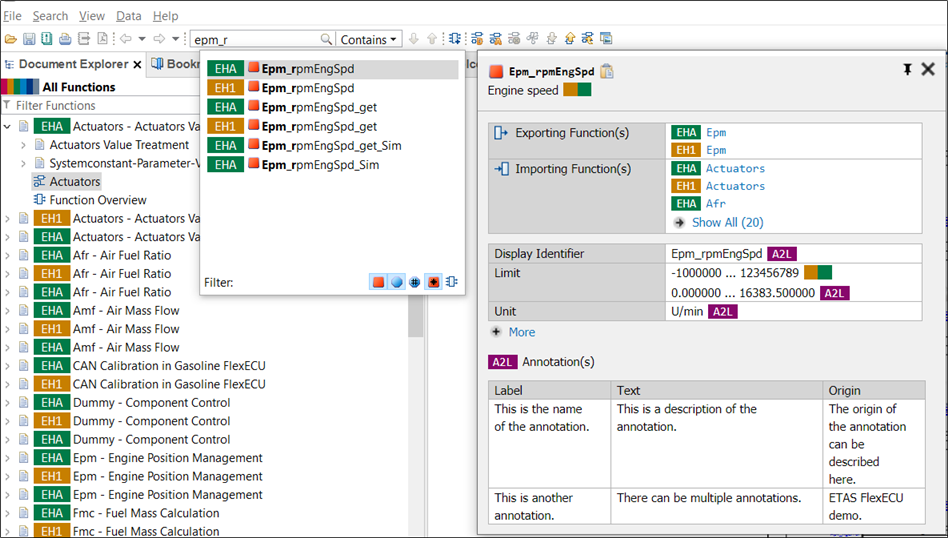
-
In the search results view, a column EHANDBOOK displays all the EHANDBOOK files where your search results are located. You can use the filter to minimize your search results and search the results only in the required EHANDBOOK file(s).

-
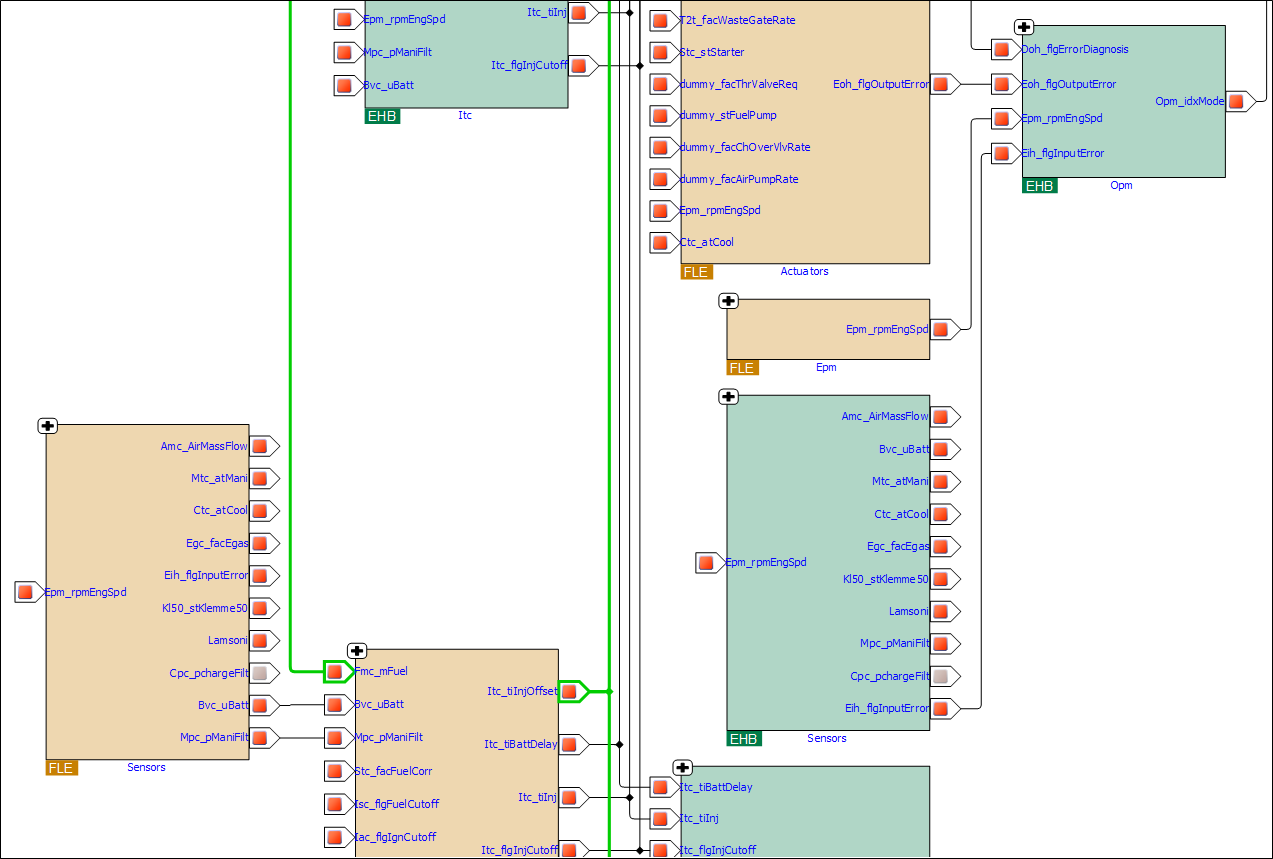
The blocks representing function in function overview diagrams are colored with the assigned color flag for its background and named with its alias name at the bottom.
NOTICE
The graphical model presentation might differ from the real ECU functionality.
The EHANDBOOK-NAVIGATOR then may contain erroneous elements and missing
user comments in an interactive model when displaying automatic layouts!
Therefore, always compare the content of the interactive model in the
EHANDBOOK-NAVIGATOR with the real ECUs function by validating that the
graphical model presentation corresponds to the ECU documentation source
before you start working.
To identify the cause for the wrong, missing or incomplete content, the producer
of the container must check the source files from where the container
was created. If the source files are correct and the appearance of the error is
reproducible, the producer of the container must contact the local sales representative
or the ETAS support to report this error.
NOTICE
The EHANDBOOK-NAVIGATOR may display erroneous connections between
functions, that do not corresponds to the real ECU software.
The functions' interface descriptions of one ore more EHANDBOOK containers
(e. g. function overviews, labels, pop-ups) may not correspond to the real ECU
software.
Therefore, always check the conformity of the functions' interface descriptions.
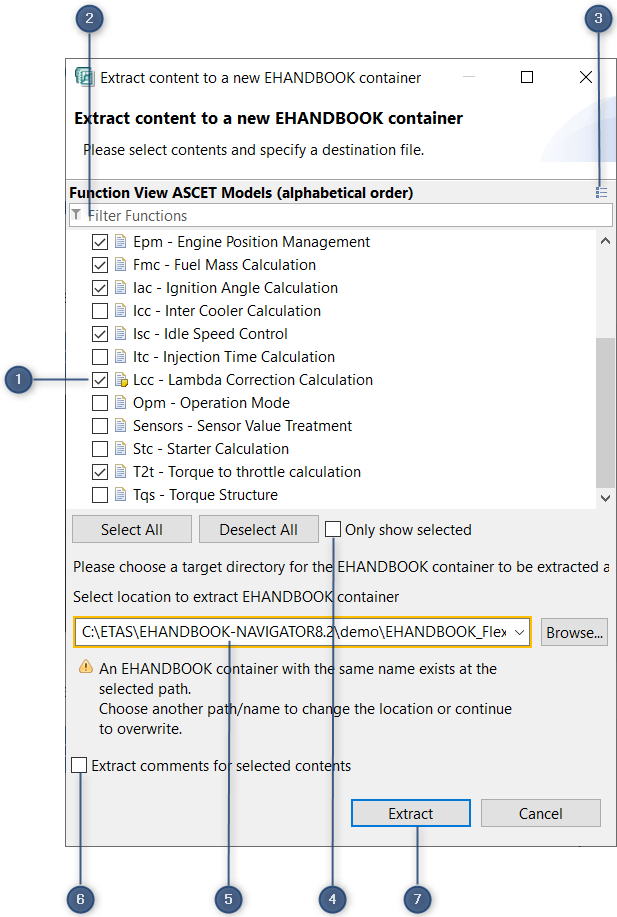
Extracting content of EHANDBOOK container
This feature helps to extract contents from the currently loaded EHANDBOOK container and generate a new EHANDBOOK container by selecting only the required functions from the existing container.
|
EHANDBOOK container ( |
To extract content to a new EHANDBOOK container:
-
Perform one of the following steps:
-
On the
Filemenu, selectExtract Content….
<Or> -
In the
Document Explorer, right-click on the required topic or subtopic.
Context-menu is displayed. -
Click
Extract Content….
<Or> -
In the
Document Viewer, right-click and selectExtract Content….<Or> -
Click
 on the toolbar.
 -
Extract content to a new EHANDBOOK containerwindow is displayed.
-
Extract content to a new EHANDBOOK container.
-
Selected functions.
-
Search filter.
-
All tables of contents.
-
Checkbox to show selected functions.
-
Target location.
-
Checkbox to extract comments.
-
Extract container.
-
Select the required function components (FCs).
When you chooseExtract ContentfromDocument ExplorerorDocument Viewer, pre-selected FC’s (1) are shown in theExtract content to a new EHANDBOOK containerwindow. You can also filter the function components (FCs) by typing the text in the Filter (2) which helps to find the function names quickly. -
Click
 (3) to change the Tables of Contents.
To select all function components, clickSelect All. To view only the list of selected function components click the checkboxOnly show selected(4). -
Select or type the target location (5) for extracting the container or click
Browse.
By default loaded container’s location is pre-selected in the target path and the container name is suffixed with_Extract.
|
EHANDBOOK container will not be generated if the name and path of the extracting container is same as the loaded container. EHANDBOOK container will be generated only if the file extension of the extracting container is same as the loaded file extension. |
-
Check the checkbox
Extract comments for selected contents(6) to copy comments to the extracted container.
By default, the checkbox is unselected. -
Click
Extract.
Please note, based on the number of entries and size of the contents, extracting the contents takes some time. -
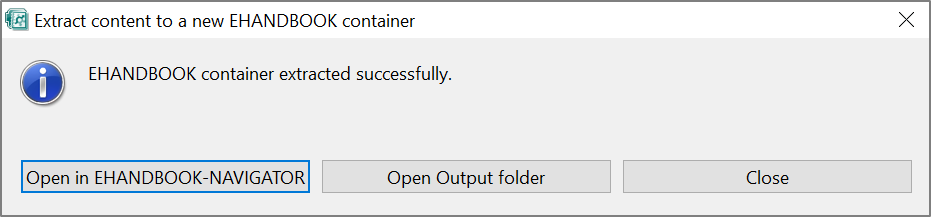
Once the EHANDBOOK container is extracted successfully, the below dialog
box is displayed.
Dialog box.
-
Click Open in
EHANDBOOK-NAVIGATOR.-
It opens the generated container in the EHANDBOOK-NAVIGATOR.
<Or> -
Click Open Output Folder.
It opens the extracted container’s file location.
<Or> -
Click Close.
It closes the dialog box.
EHANDBOOK-NAVIGATOR generates a new container with the extracted functions. The tables of contents of the extracted container contains the extracted functions only.
-
Annotating the Values from A2L/HEX/DCM/CDF Files
The values for Scalar Parameters and System Constants are annotated to the
Model Viewer (like live data from INCA and data from measurement files). This
helps to understand more easily on how an ECU function is calibrated.
EHANDBOOK-NAVIGATOR takes the values from the loaded A2L (*.a2l), HEX
(*.hex, *.s19) or DCM (*.dcm)/CDF (*.cdfx)/PaCo (*.xml) files.
The Display Value (Display all values)/Hide Value (Hide all values) shows or hides
the values.
To annotate the values:
Firstly, load the A2L, HEX, DCM/CDF/PaCo files as below:
-
Go to
Datamenu →Measurement and Calibration Files.
Measurement and Calibration Filesdialog box is displayed. -
Select the A2L, HEX, DCM/CDF/PaCo files and click
Load.
The selected A2L, HEX, DCM/CDF/PaCo files are loaded.
Then, annotate the values for Scalar Parameters and System Constants by any of the following methods: -
Right-click on a label in the Interactive Model/Function Overview Diagram.
A context menu is displayed. -
Click
Display Value.
<Or> -
Click
Display all valuesin the Status bar.
<Or> -
Go to
Datamenu, selectDisplay all Values.
The values are annotated in the Model viewer based on the values feeded in the respective A2L, HEX, DCM/CDF/Paco files.
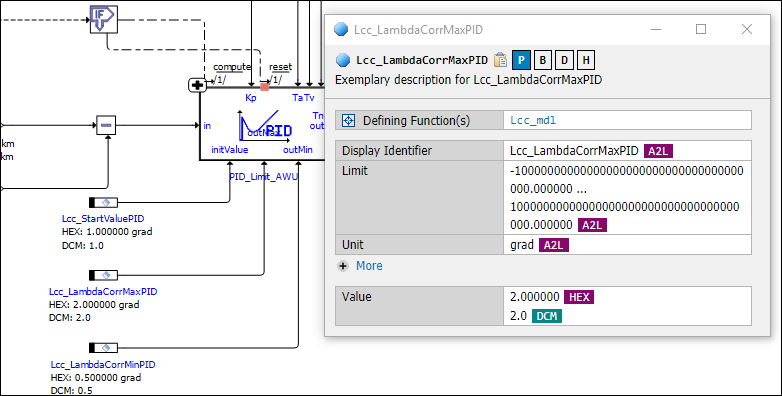
Annotation of values.
On the same way, you can also hide all the displayed values.
|
The "Find in current tab" feature will not search the annotated values. |
Create AsciiDoc References from Model Explorer
To create model reference for documentation from Model Explorer:
-
Go to Model Explorer.
-
Select the required model and right-click.
A context menu is displayed. -
Click
Copy as model reference for AsciiDoc.
<Or> -
Press <CTRL+C>.
A notification pop-ups.
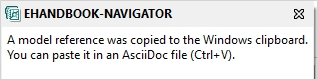
The model reference path is copied and it can be pasted in the AsciiDoc file.
To create function overview reference for documentation from Model Explorer:
-
Go to Model Explorer.
-
Select the required model and right-click.
A context menu is displayed. -
Click
Copy as function overview reference for AsciiDoc.
A notification pop-ups.
The model reference path is copied and it can be pasted in the AsciiDoc file.
|
The function overview feature is available at the function overview diagram level or at the function component root node level. |
|
Both features are available in all model languages (ASCET/Simulink/C-code models). |
Working with Bookmarks/Model Views
Library feature in EHANDBOOK-NAVIGATOR allows you to store the location
of the container topics, subtopics, and the interactive models for later retrieval.
Topics containing textual content can be bookmarked and the state of the model can be saved using the model views.
The tasks that assist in using Library view are as follows:
Creating a Bookmark
To create a bookmark for textual content:
-
In the
Document Explorer, right-click on the required topic or subtopic and selectCreate Bookmark…in the context menu displayed.
Create Bookmarkwindow is displayed.
<Or> -
In the
Document Viewer, go to the required topic and click icon.
icon.
Create Bookmarkwindow is displayed. -
Enter the
NameandDescriptionfor the bookmark.
The location of the selected topic is displayed in theLocationtext box. -
Click
Createto create the bookmark.
The bookmark is created and can be accessed from the Bookmarks view.
Saving a Model View
-
Right-click on the required interactive model or model block and select
Save Model Viewin the context menu displayed.
Save Model Viewwindow is displayed.
<Or> -
To the right of the breadcrumb bar, click
 icon.
icon.
Save Model Viewwindow is displayed. -
Enter the
NameandDescriptionfor the bookmark.
The location of the selected topic is displayed in theLocationtext box. -
Click
Createto save the Model View.
The model view is saved and can be accessed from the Library view.
|
When you move the mouse cursor over the bookmark/model view name, the name and description about the bookmark/model view is displayed. |
|
You can save the Function Overviews that contain multiple functions using model view. The created location string will list the names corresponding to those functions.
You can assign a name using the |
|
To show/ hide star icon in the |
Editing a Bookmark
To edit a bookmark:
-
In the
Libraryview, right-click the bookmark you want to edit and selectEditin the context menu.
Edit Bookmarkswindow is displayed. -
Edit the
NameandDescriptionfor the bookmark and clickFinish.
The changes made to the bookmark are saved.
Editing a Model View
To edit a model view:
-
In the
Libraryview, right-click the model view you want to edit and selectEditin the context menu.
Edit Model Viewwindow is displayed. -
Edit the
NameandDescriptionfor the model view and clickFinish.
The changes made to the model view are saved.
Deleting a Bookmark/Model View
To delete a bookmark/model view:
-
In the
Libraryview, right-click the bookmark/model view you want to delete and SelectDelete.
The bookmark/model view is deleted.
Creating a Folder
To create a folder:
-
In the
Libraryview selectCreate a Folderin the context menu.
Create a Folderwindow is displayed. -
Enter the
NameandDescriptionfor the folder and clickFinish.
The folder is saved in the My Library folder.
|
You can create a folder within a folder. |
|
You can drag and drop bookmarks/model views to the folder. Same bookmarks/model views can be used in multiple folders. |
Editing a Folder
To edit a folder:
-
In the
Libraryview , right-click the folder you want to edit and selectEditin the context menu.
Edit Folderwindow is displayed.
<Or> -
Click the folder you want to edit and press
F2.
Edit Folderwindow is displayed. -
Edit the
NameandDescriptionfor the folder and clickFinish.
The changes made to the folder are saved.
Deleting a Folder
To delete a folder:
-
In the
Libraryview, right-click the folder you want to delete and clickDelete.
The folder is deleted.
Importing Bookmarks/Model Views
To import bookmarks/model views to Library view:
-
Click
Import Bookmarks and Model Views from library fileicon present in the "Library" view.
Import Bookmarks and Model Viewswindow is displayed.
<Or> -
From the
Filemenu, selectImport.
Importwindow is displayed. -
Select
Bookmarks and Model Viewsfrom theEHANDBOOKfolder and then clickNext.
Import Bookmarks and Model Viewswindow is displayed.
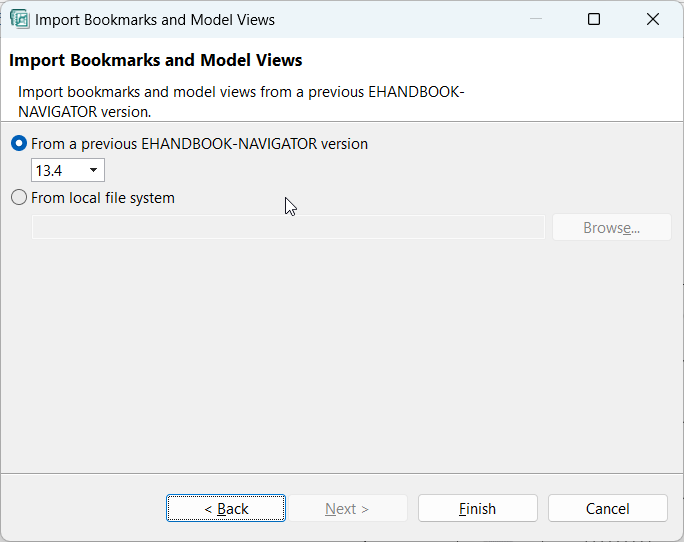
-
Click
From a previous EHANDBOOK-NAVIGATOR versionbutton and select the version from the drop-down list.
|
Only bookmarks/model views that you have created in the previous navigator versions are displayed in the drop-down list. |
-
Click
Browseand select the library file (*.ehblib or *.bookmarks) you want to import. -
Click
Finish.
The bookmarks/model views are imported to the "Library" view.
|
Bookmarks/model views are imported into a folder having the name of the *.bookmarks or *.ehblib file. |
|
Import Bookmarks and Model Views functionality is not supported in Basic Mode of EHANDBOOK-NAVIGATOR. A message is displayed indicating the non-availability of the function in Basic Mode. |
Exporting Bookmarks/Model Views
To export bookmarks/model views from Library view:
-
Select the Bookmark/model view or the folder you want to export.
-
Click
Export Bookmarks and Model Views from library fileicon present in theLibraryview.
Export Bookmarks and Model Viewswindow is displayed.
<Or> -
From the
Filemenu, selectExport.
Exportwindow is displayed. -
Select
Bookmarks and Model Viewsfrom theEHANDBOOKfolder and then clickNext.
Export Bookmarks and Model Viewswindow is displayed.
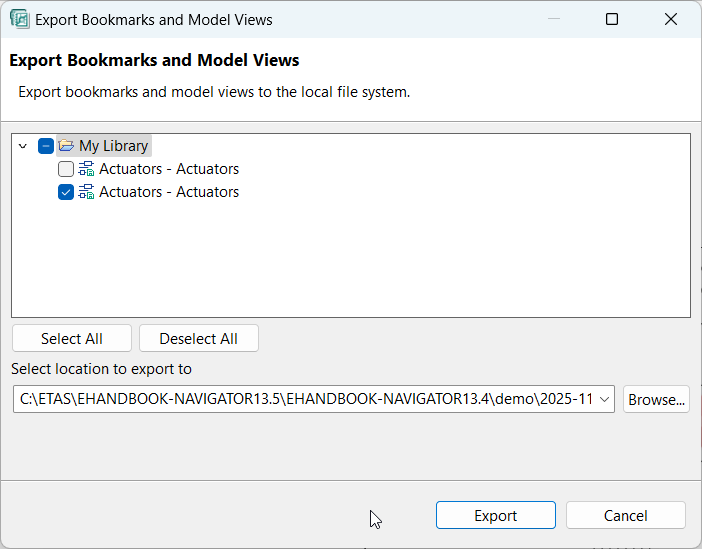
-
Click
Browseand select the location for exporting the library file. -
Select or clear the Bookmarks/model views or Library folder as required.
-
Click
Finish.The library file (*.ehblib) is exported to the selected location.
|
Export Bookmarks and Model Views functionality is not supported in Basic Mode of EHANDBOOK-NAVIGATOR. A message is displayed indicating the non-availability of the function in Basic Mode. |
Valid or Invalid Bookmarks
My Library folder displays all the bookmarks/model views created. This includes valid and invalid bookmarks. Valid bookmarks are highlighted and invalid bookmarks are grayed out. Clicking on the invalid bookmark displays the following error message.

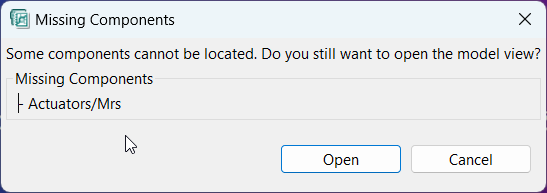
Valid,Partially Valid or Invalid Model Views
Valid model views are highlighted and partially valid and invalid model views are grayed out.The partially valid model views have a warning icon attached. Clicking on the partially valid model view displays the following error message. A partially valid model view can be opened,which will render the model with the available components.
Working with Comments
Comments feature in EHANDBOOK-NAVIGATOR allows you to add comments to specific portions of Document Viewer. Comments can be added to titles, figures and paragraphs. You can delete a comment. Comments can also be imported from another EHANDBOOK container or Comments file. You can also copy the comment to clipboard, which can be used in any other application by pasting it from clipboard.
|
Comments feature in EHANDBOOK-NAVIGATOR basic mode support to write and save comments, but importing or exporting of comments is not allowed. |
|
Comments are saved within the container. It can also be extracted to a new EHANDBOOK container. Comments can also be exported to a Comments file. |

-
Comments empty
-
Comments text box
-
Comments added
-
Options icon
-
Contains comments and import comments
-
Contains comments
-
Contains comments
To add comments:
-
Hover the mouse next to a title, figure or a paragraph.
A comment icon is displayed. -
Click on the comment icon to add comments.
A text box is displayed to add the comment. -
Add the required comment.
The color of the comment icon changes indicating the presence of comments.
To delete comments:
-
Click on the required comment icon, if the comment text box is not open.
-
On the top right corner of the comment text box, click on the options icon.
A menu is displayed. -
Click
Delete commentto delete the comment.
The comments added are deleted.
To copy comments to clipboard:
-
Click on the required comment icon, if the comment text box is not open.
-
On the top right corner of the comment text box, click options icon.
A menu is displayed. -
Click
Copy text to clipboardto copy the comment.
<Or> -
Select the comment and right-click.
A context menu is displayed. -
Select
Copy.
<Or> -
Select the comment and press <CTRL+C>.
The comments added are copied and it can be pasted to any application.
To save comments in the container:
-
When you close EHANDBOOK-NAVIGATOR or when you open some other container, a prompt message is displayed to save the changes. Click Save in the prompt message to save the comments in the container.
|
The comments which are added in the file will also be saved when you save it
by clicking |
To export comments:
-
From the
Filemenu, selectExport.
Exportwindow is displayed.

-
Select
Commentsfrom the Documentation folder and then clickNext.
Export Commentswindow is displayed -
Select the EHANDBOOK container from which you want to export the comments.
-
Click
Browseand select the Comments file into which you want to export the comments.
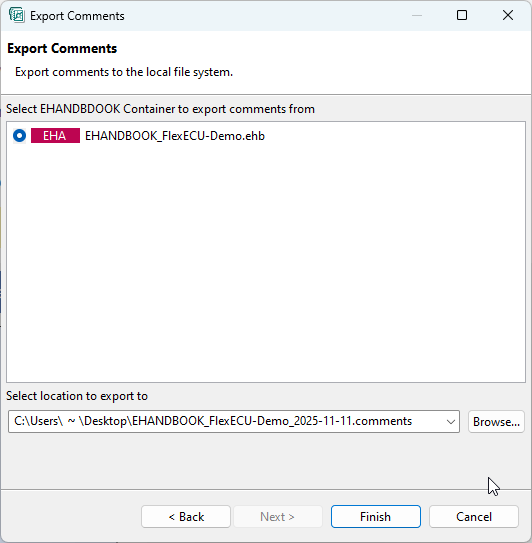
-
Click
Finishto complete exporting of comments.
To import comments:
-
From the
Filemenu, selectImport.
Importwindow is displayed.
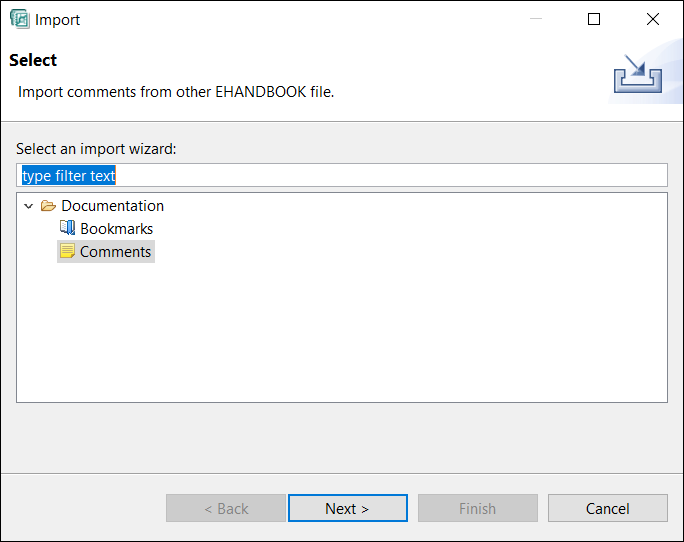
-
Select
Commentsfrom the Documentation folder and then clickNext.
Import Commentswindow is displayed -
Click
Browseand select the EHANDBOOK container or Comments file from which you want to import the comments. -
Select the EHANDBOOK container into which you want to import the comments.
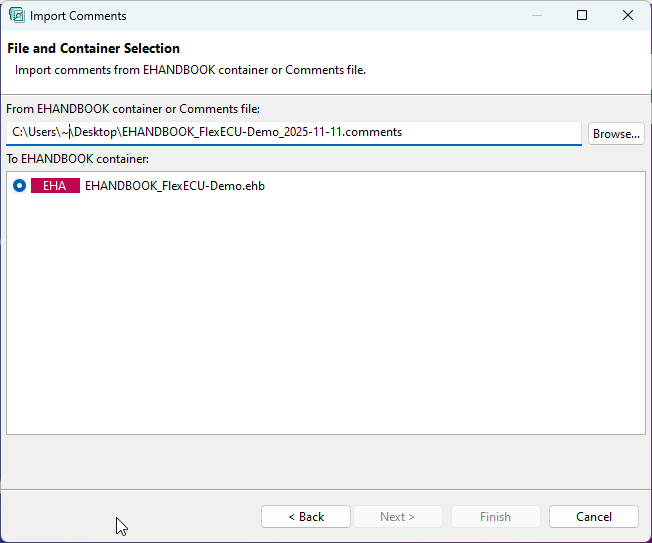
-
Click
Next. A summary of the comments imported is displayed. In the summary, a list of comments that cannot be imported to a location (error marker) is displayed. This helps you to know the comments which are affected.
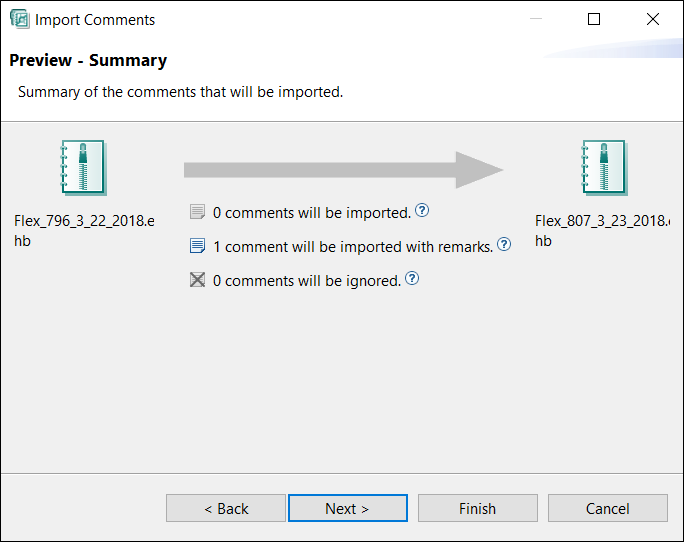
-
Click
Next.

-
Click
Finishto complete importing of comments.
Model Comments
Comments are also available for interactive models and function overviews.
You can add comments to all blocks that can be extended, which is indicated by the plus icon in the upper left corner.
Using the context menu on these blocks, you can create a comment and directly enter text. Links can also be added and will be recognized, as well as lists other formatting options using Markdown.
|
Only one comment can be linked to each block. |

-
Open / hides the comment area
-
Indicator for a comment corresponding to this block
-
Highlighted block corresponding to the selected comment in the comment area
-
Filter the comments
-
Sort the comments by creation or modification date, resp.
-
Menu offering further options
-
Edit the content
-
Copy the content to clipboard
-
Delete the comment
To identify corresponding blocks and comments:
Hovering over a comment highlights the corresponding block in the model. Vice versa, clicking the little comment icon next to a block highlights the corresponding comment, while double-clicking allows for immediate editing.
For exporting and importing see Working with Comments.
Using Navigation History
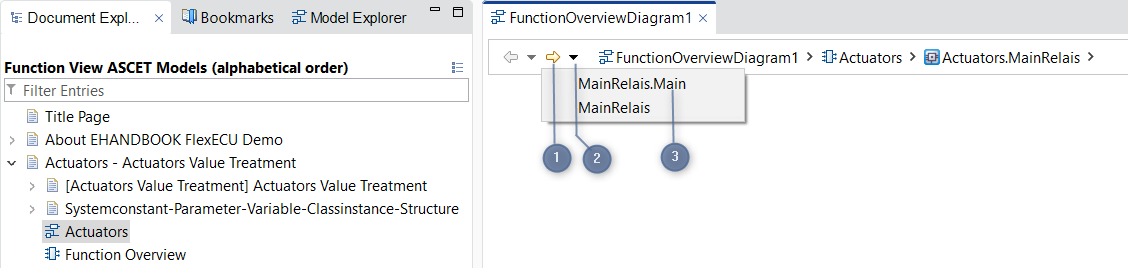
Navigation history records the locations you have visited previously in the EHANDBOOK container. It is similar to the history feature available in a web browser. It records locations containing interactive models and documentation in their respective editors. The number of entries in the history is limited to 50, after which the last entry would be cleared out. Navigation buttons allow you to navigate back and forth within the navigation history.
The system records navigation history in the following scenarios:
-
For the Document Viewer:
-
Clicking on entries in the TOC.
-
Show Documentationfrom Model Viewer. -
through the Label popup.
-
through the Bookmarks.
-
through the Clickpick.
-
Opening a search hit from Global search.
-
-
For the Model Viewer:
-
Opening an interactive model.
-
Opening a function overview.
-
Navigating in or out.
-
While using the Model Explorer.
-
While using the breadcrumb bar.
-
The system clears the existing navigation history in the following scenarios:
-
For the Document Viewer:
-
When the Document Viewer is closed.
-
-
For the Model Viewer:
-
When the Model Viewer is closed.
-
When an open location is used.
-
When a URI (Uniform Resource Identifier) is entered through the breadcrumb bar.
-
When a function is added/removed/edited from a function overview.
-
Navigating Back

-
Back button
-
Drop down button
-
Prior locations visited
You can navigate to the prior locations one at a time or jump directly to a previous location in the Navigation History. Navigation buttons are enabled after you have explored more than one location.
You can use these navigation buttons are as follows:
-
Click
Backward(1) in the toolbar.
It navigates back to one location at a time. -
Click the drop-down button (2) in the toolbar.
A list of locations (3) visited before the active location is displayed. -
You can select the location you want to navigate from a list of locations (3).
The selected location is displayed.
Navigating Forward
-
Forward button
-
Drop-down button
-
Subsequent locations visited
You can navigate to the subsequent locations one at a time or jump directly to a subsequent location in the Navigation History. Navigation buttons are enabled after you have explored more than one location.
You can use these navigation buttons are as follows:
-
Click
Forward(1) in the toolbar.
It navigates forward to one location at a time. -
Click the drop-down button (2) in the toolbar.
A list of locations (3) visited subsequent to the active location is displayed. -
You can select the location you want to navigate from a list of locations (3).
The selected location is displayed.
Sorting and Filtering Keyboard Shortcuts
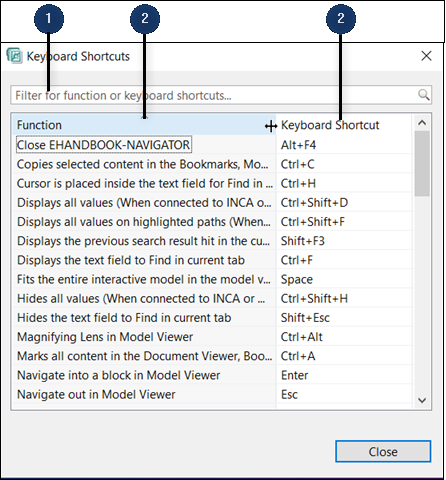
EHANDBOOK-NAVIGATOR supports filtering and sorting of available keyboard shortcuts.
-
Filter field
-
Sort button
To filter keyboard shortcuts:
-
Go to
Helpmenu and clickKeyboard Shortcuts… (<CTRL+F1>).
<Or> -
Click
Keyboard Shortcutsbutton in the toolbar.
Keyboard Shortcutswindow is displayed. -
Type the text in the
Filter field(1).
Filtered entries are displayed.
To sort keyboard shortcuts:
-
Go to
Helpmenu and clickKeyboard Shortcuts… (<CTRL+F1>).
<Or> -
Click
Keyboard Shortcutsbutton in the toolbar.
Keyboard Shortcutswindow is displayed. -
Click
Sortbutton(2).
The column is sorted alphabetically from A-Z. -
To reverse the sorting click on the Sort button again.
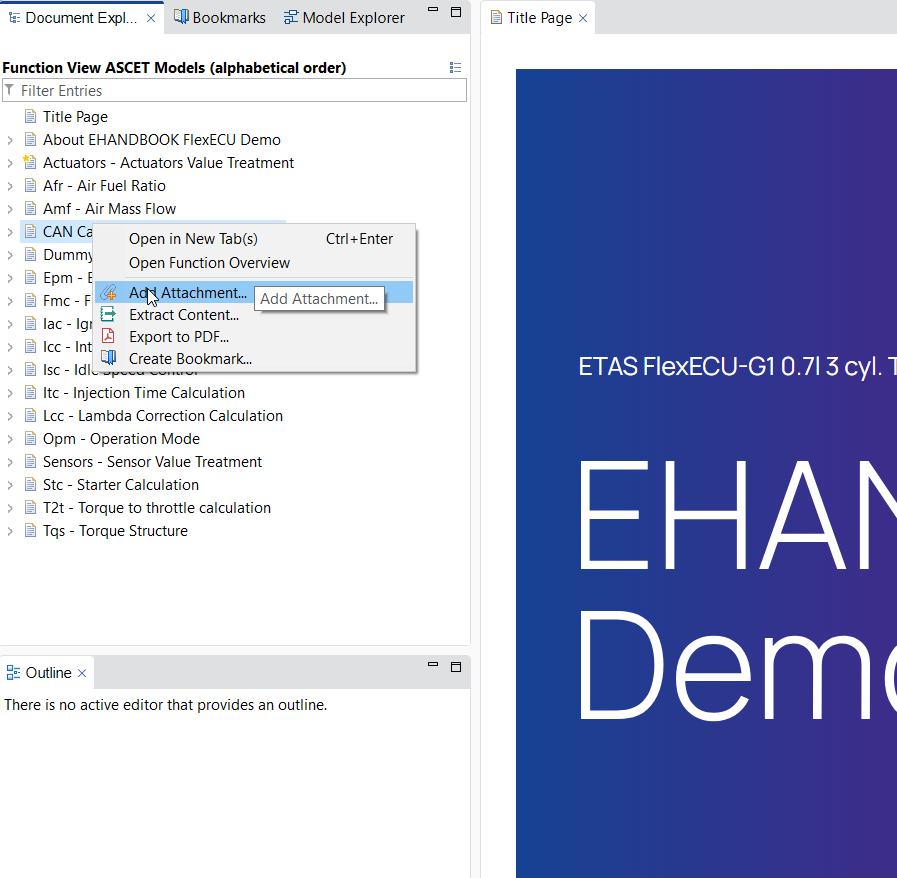
Attachment Handling
EHANDBOOK-NAVIGATOR supports adding attachments to the table of contents. It also allows the deletion of existing attachments. Both operations require a save of the EHANDBOOK container to be persisted. Attachments can be added at topic level or at an attachments level inside a topic.
Adding an Attachment
-
Right click on the FC to which you want to add the attachment.
-
Select
Add Attachment..from the context menu.
-
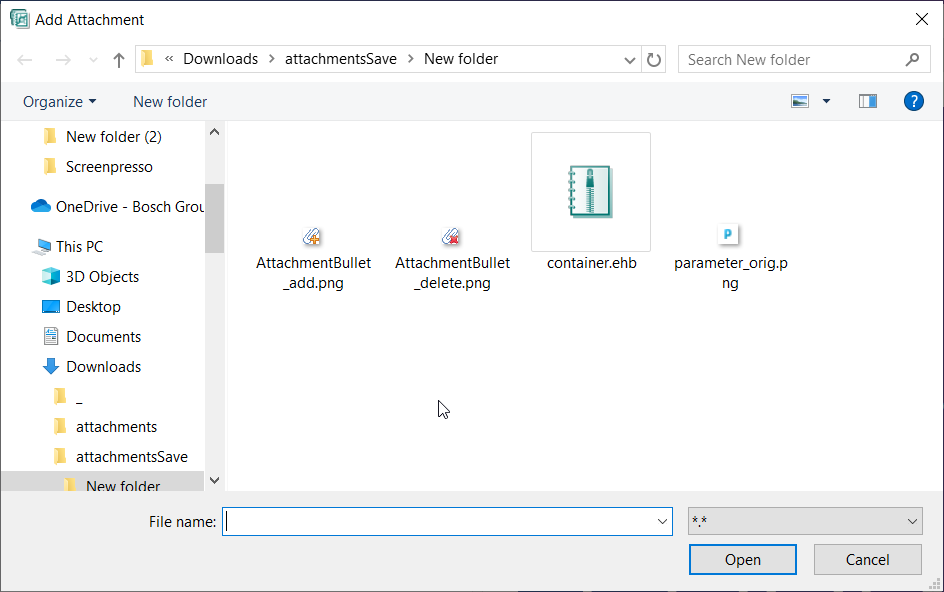
You will get a popup to select the attachment you wish to add.
-
Select the file and click on
Open. -
The attachment gets added to the topic as shown below
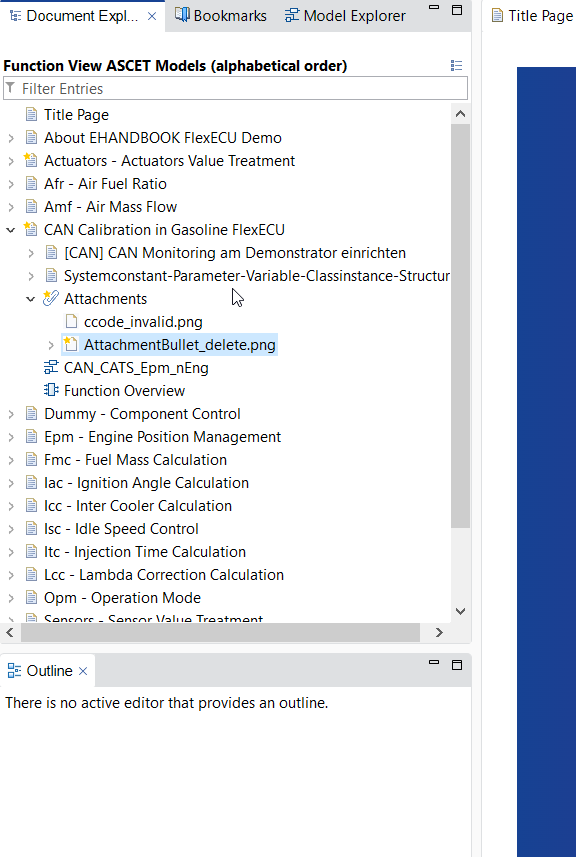
-
You can also select the
Attachmentsand add new attachments. -
A
 symbol will be shown on the attachments which are newly added.
 -
You can save the newly added attachment to the container by clicking on the
 (
(save) button.