Visualization of Offline Measurement
EHANDBOOK-NAVIGATOR allows the calibration engineer to read the documentation and also mirror the live values into the documentation which is a big help to understand the software.
This is the new scenario where EHANDBOOK-NAVIGATOR supports with the MCD here. Compared to the live visualization where time moves forward at a constant pace (a sample is taken every 250 ms), the offline visualization allows the calibration engineer to move back, finds a value being out of range/too high/too low and investigate the cause. Either engineer can fix it by adjusting some calibration value (or even report a bug to the developer of the ECU software).
A Data Source provides values for names/labels in interactive models. Switching between different Data Sources will remove already added values from all the interactive models. The newly added functionality in EHANDBOOK-NAVIGATOR is the Measurement and Calibration Files. It allows the visualization of values which are recorded previously. For example, with INCA.
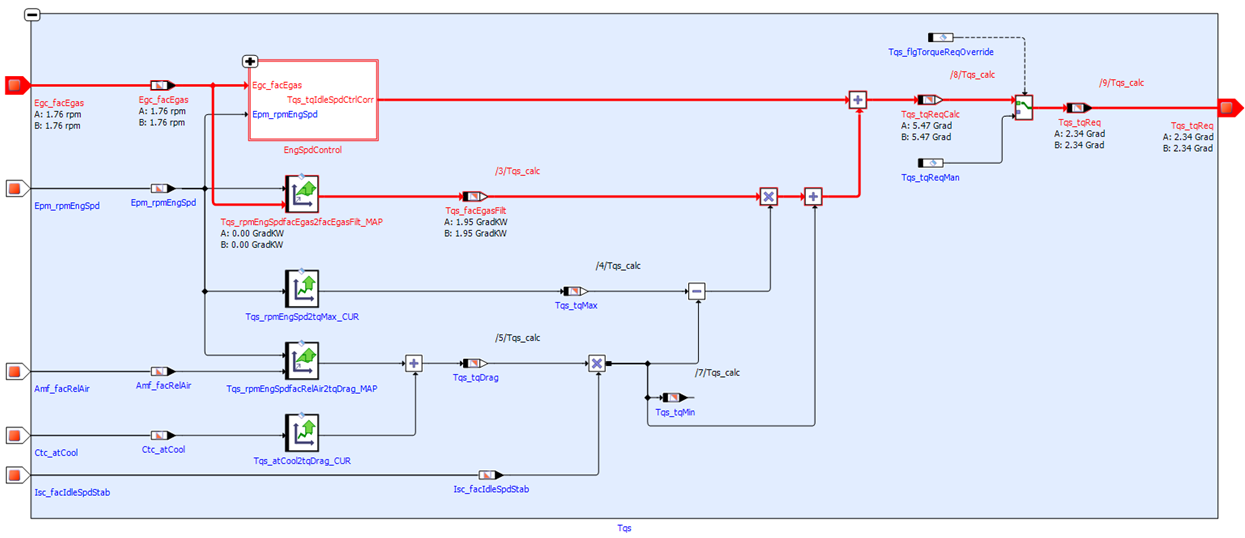
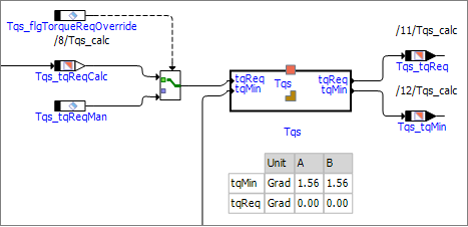
Measurement and calibration values for the labels related to ASCET 6 record type blocks are displayed as shown below.
The value format of a label displayed in the EHANDBOOK-NAVIGATOR using Measurement and Calibration Files comprises of the following criteria:
-
If the FORMAT is attached to a label in an A2L file, then by default the defined format value is applied.
-
If FORMAT is not available but COMPU_METHOD is defined, then the format that is defined in the mentioned compuMethod will be applied.
-
If there is neither FORMAT nor COMPU_METHOD available, the user defined format in the
Preferencesdialog box on theData Visualizationtab is used.
|
The number format of the A2L file is also used for the label values from DCM, PaCo or CDF files. |
Show offline measurement values
-
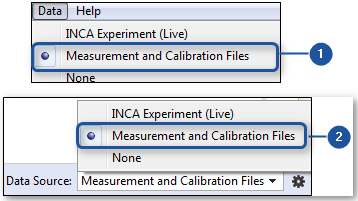
Go to
Datamenu and selectMeasurement and Calibration Files.
<Or> -
Select
Measurement and Calibration Filesin theData Sourcedrop-down menu on the status bar.
-
Connecting through Menu item
-
Connecting through Toolbar
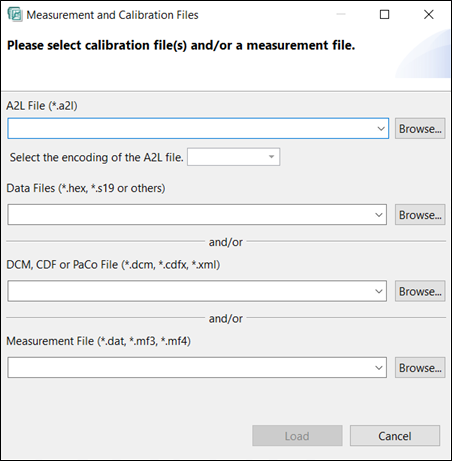
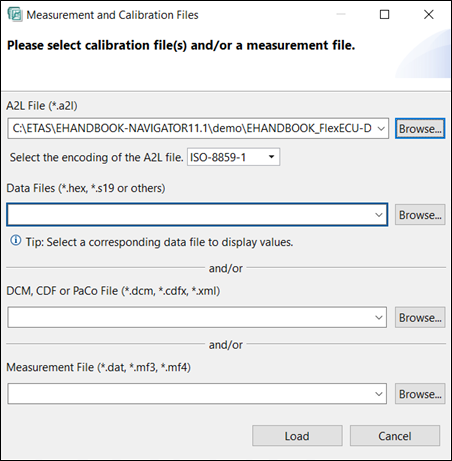
Measurement and Calibration Filesdialog box is displayed.
-
Type the A2L file of type:
*.a2l. Please note that, the EHANDBOOK-NAVIGATOR supports functions with duplicate function names in the A2L files.
<Or> -
Click
Browse… to select the file. -
After selecting an A2L file the encoding of the content is placed in the drop-down menu. By default, the highest encoding confidence level (e.g. ISO-8859-1) is pre-selected. If the encoding is not known or it is not consistent for the whole file then choose Detect automatically.
-
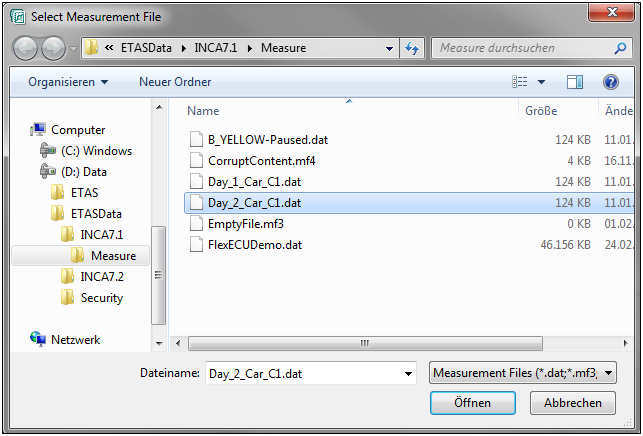
Type the Data file of type:
*.hex,*.s19or others.
<Or> -
Click
Browse… to select the file. -
Type the DCM, CDF or PaCo file of type:
*.dcm,*.cdfx,*.xml.
<Or> -
Click
Browse… to select the file. -
Type the measurement file of type:
*.dat, or*.mf3, or*.mf4.
<Or> -
Click
Browse… to select the file.
|
The loading of a file is not possible, if the file is empty or not readable due to permission error or corrupted content due to unknown reason. In such cases, the appropriate error messages will be shown. |
-
The measurement and calibrations files which are loaded successfully will be added to the history. It becomes visible when you try to select the file next time from the drop-down menu. This helps to access previously loaded files quickly. The oldest, unused entry will be removed automatically when the history limit is reached. Clearing the history is not possible.
-
When you load the measurement file, its time ranges are shown at the bottom of the interactive model window. The range typically starts with zero, but this does not imply that measurement samples are also available with the beginning of the range. All buttons and fields are grayed out as long as the values are not added to a model.

-
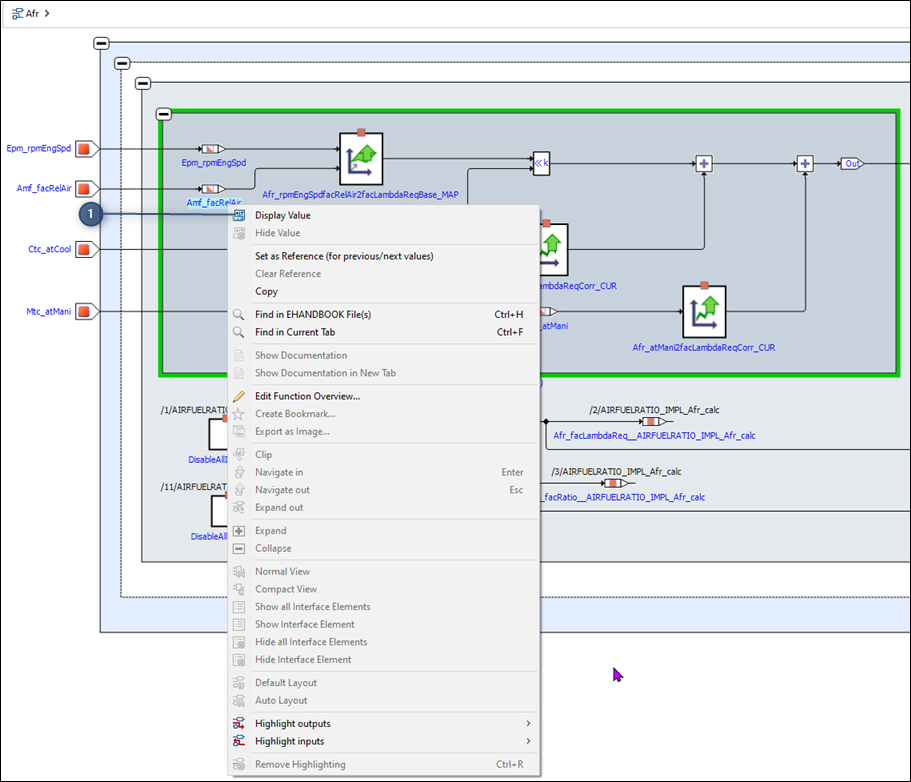
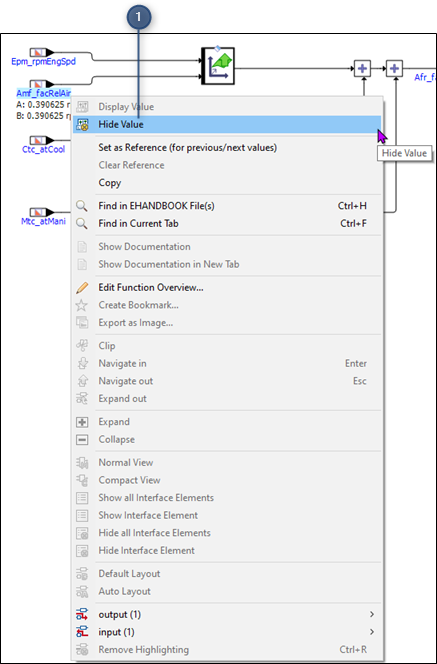
Right-click on a label in an interactive model to add a value.
A context menu is displayed. -
Click
Display Value.
-
Display Value
<Or>-
Click
 on the toolbar to display all measurement and calibration values.
 -
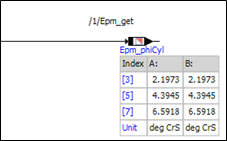
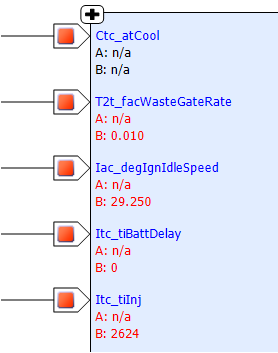
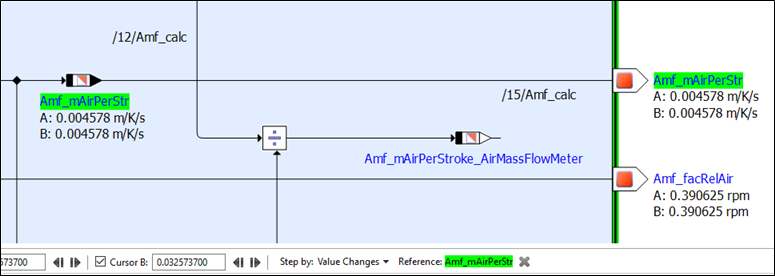
The two cursors (A and B) are available and these values are added below the label(s) along with its units. Associated measurements values are prefixed with A and B to show to which cursor they belong to.
-
It is also possible to hide the annotated values of either Cursor A or B by selecting the checkbox on the status bar. The disabled cursor value is not displayed, and the edit field for the time value is also disabled.
-
-
All the measurement values that are indexed are displayed. If the value of any of the indices are different, then they are displayed in red text.
-
When doing recordings (since INCA version 7.4.7) the format of indexed measurement values can follow different pattern. To accommodate this the index is automatically recognized whether the index is separated by an underscore like in
variable_[0]or if the index is following the name immediately like invariable[0]. No manual settings required. -
The numeric values that are found in the measurement files are replaced by their corresponding textual entries in the COMPU_VTAB.
-
If no value is available, for example, when no value has been recorded up to the current cursor position, the text "n/a" is displayed.
-
It is also possible to remove a single value.
-
Right-click on a label in an interactive model to hide a value.
A context menu is displayed. -
Click
Hide Value.
-
Hide Value.
-
For measurement values, values are displayed if they are recorded before. In some cases, few label names will not have a value recorded. In the current implementation, the values for the System Constants are not shown. In such cases, when you right-click on a value, the context menu displays only the disabled state of
Display Value (Not available in current data
source)
or (or in the currently selected device, but the long text would not fit into the context menu). In such cases, a new recording is required. -
Display all measurement and calibration values
and Hide all measurement
and calibration values  allow to add values to all known labels
and to remove all label from the currently active interactive model.
allow to add values to all known labels
and to remove all label from the currently active interactive model.
-
|
No extra message is shown if few of the labels or all labels do not have values. |
-
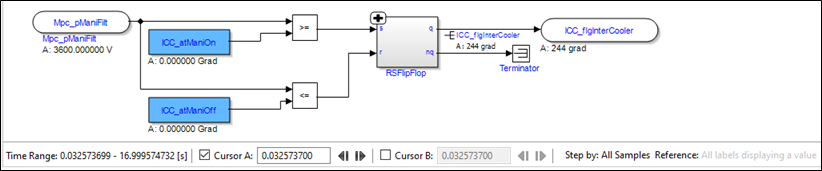
After adding at least one value, the time field and the navigation buttons become enabled. Automatically, the time of the first sample is shown which may not be zero as expected. A new time may be entered in seconds with fraction and the value is updated to the time of the next measurement sample after this point in time. There is only one time value for all inter- active models. So changing it in one model changes the time for all models and therefore the values.


-
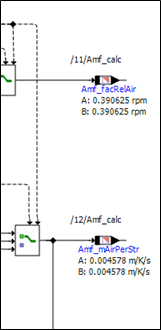
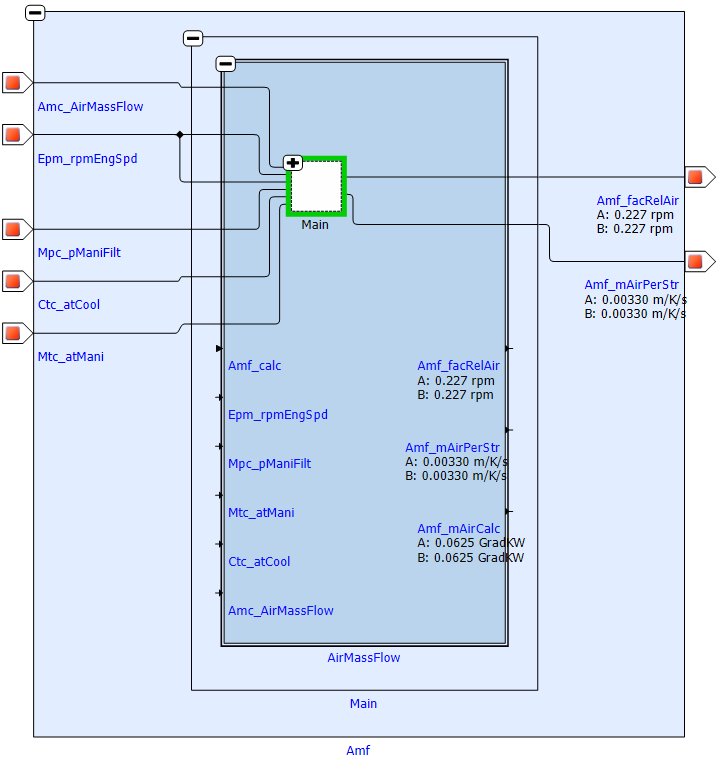
When you expand a block by clicking
 icon on an interactive model, all
label names that already have a value assigned, also get updated with values
automatically. Here the labels in the above example have a value.
icon on an interactive model, all
label names that already have a value assigned, also get updated with values
automatically. Here the labels in the above example have a value.
|
Labels inside a box never show values as the box is quite full already. |
-
But, when you expand the box or interactive model, all labels get a value assigned if a value is already known. This saves your time to add labels again which you are interested in.
-
This happens even if you close the interactive model and open the same or another interactive model. For all known labels, the value get updated automatically.
-
The forward navigation button (
 ), backward navigation button (
 )
allow to step ONE sample forward and backward respectively in time. This
is not intended as a way to move in time.
)
allow to step ONE sample forward and backward respectively in time. This
is not intended as a way to move in time.
The functionality of the Set as Reference (for previous / next values) is to
step the next/previous value sample buttons. Without a reference, the time is
increased to the time next value sample.
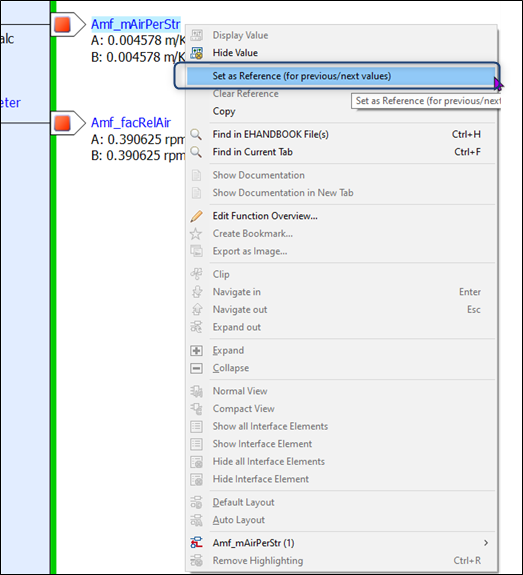
With the reference set on a label, the time is increased/decreased until the value
of the label changes. This can be 50 milliseconds or 500 seconds.
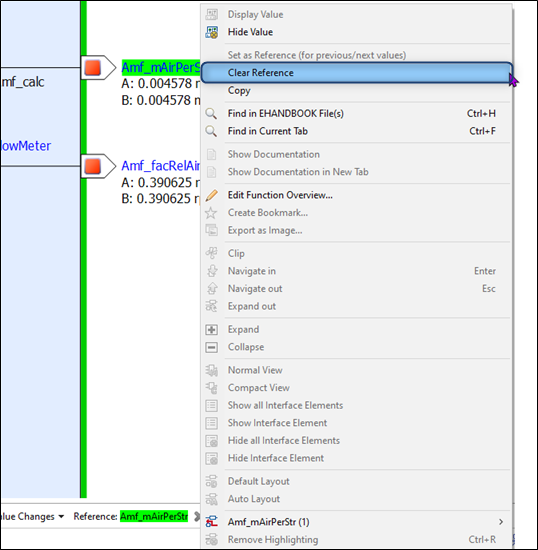
Only one label can be used as a reference at a time. When you click on Set as
Reference (for previous/next values), the referenced label will be highlighted
with green. Selecting a different label will replace the existing reference.
You can clear the reference variable by clicking on Clear Reference.
NOTICE
The EHANDBOOK-NAVIGATOR may display wrong measurement values in the interactive model.
Affected values of the interactive model can be displayed erroneous in the interactive model when the wrong measurement file is chosen or because of display errors.
Therefore, always check the conformity of the displayed measurement values with a suitable tool for measurement data analysis.
NOTICE
The EHANDBOOK-NAVIGATOR may display erroneous information and data of the application labels.
Affected information and values, especially calibration parameters, can be displayed erroneous in the EHANDBOOK-NAVIGATOR when the content of the EHANDBOOK container or project does not match to the content of the input data. The following formats are concerned:
-
A2L
-
HEX
-
S19
-
DCM
-
CDF
-
PaCo
-
MDF
Therefore, always check the conformity of the files used in the container and project before you start working.
Displaying all Values on Highlighted Paths
When you are working with the interactive models, you can add the labels only for the highlighted signals. This helps to visualize only the right labels which are needed for you.
To display the values for the labels on highlighted paths:
-
Connect to an INCA experiment Connecting to INCA Experiment or load the Measurement and Calibration files Show offline measurement values.
-
Highlight an input block or output block Highlighting/Hiding Inputs of a Block or Highlighting/Hiding Outputs of a Block.
-
Go to
Datamenu and clickDisplay all Values on Highlighted Paths.
<Or>
Click on the Status bar.
<Or>
Press <CTRL+SHIFT+D>.
Displays the values only for the highlighted labels.