Quick Start
Installing Navigator
This chapter provides relevant information to all users who install, maintain or uninstall EHANDBOOK-NAVIGATOR on a PC or a network as well as for system administrators who provide EHANDBOOK-NAVIGATOR on a file server so that the program can be installed via the network.
Preparing to Install
Check to make sure the package contents and the license files have been delivered and your workstation complies with the system requirements. Make sure you have the necessary user previleges for the operating system and the network connection being used. You must have administrator privileges to install EHANDBOOK-NAVIGATOR.
System Requirements
The minimum requirements for the EHANDBOOK-NAVIGATOR PC ensure that the
EHANDBOOK-NAVIGATOR will run smoothly, and the recommended PC
configuration means that it will operate very efficiently. Please consider that large
EHANDBOOK containers and INCA experiments require more memory.
Added performance boost depends on the hard disks average access time and the power-saving modes that have been enabled for computer components (processor, hard disk, etc.).
Minimum PC Requirements:
-
2GHz Quad Core PC or faster x64-bit processor with SSE2 instruction set
-
Operating systems:
-
WINDOWS® 11 (64 bit)
-
-
Memory (RAM)
-
Minimum 4 GB free RAM for running EHANDBOOK-NAVIGATOR
-
Minimum 8 GB system RAM (64-bit) for running EHANDBOOK-NAVIGATOR in parallel with other software applications
-
-
Hard disk with a minimum of 10-20 GB of free space
-
DirectX 10 Graphics card with a monitor resolution of atleast 1920x1080 or higher
|
When using EHANDBOOK-NAVIGATOR in a virtual environment, 3D Acceleration must be enabled in the Display Settings during the setup of the virtual machine. |
|
The support of Windows 7, 8.1 and 10 is officially stopped from ETAS GmbH and Microsoft®. |
Recommended PC Requirements:
-
3GHz Octa Core PC or faster x64-bit processor with SSE2 instruction set
-
Operating systems:
-
WINDOWS® 11 (64-bit)
-
-
Memory (RAM)
-
Minimum 8 GB free RAM for running EHANDBOOK-NAVIGATOR
-
Minimum 16 GB system RAM (64-bit) for running EHANDBOOK-NAVIGATOR in parallel with other software applications
-
-
Hard disk with a minimum of 10-20 GB of free space
-
DirectX 10 Graphics card with a monitor resolution of atleast 1920x1080 or higher
-
SSD Drive
|
The disk space specified is required for installation of EHANDBOOK-NAVIGATOR. Additional disk space is required by EHANDBOOK-NAVIGATOR for efficient caching of EHANDBOOK containers. Caching of EHANDBOOK containers increases performance when you repeatedly work with the same EHANDBOOK container over a period |
Required User Privileges for Installation
In order to install EHANDBOOK-NAVIGATOR on a PC, you need user privileges of an administrator. Please contact your system administrator, if necessary.
Installation
System Check:
Windows 11 is required to install EHANDBOOK-NAVIGATOR. If you try to install EHANDBOOK-NAVIGATOR on the PC with Windows XP, Windows 2000 or an earlier OS, an error message opens and the installation is aborted. The installer performs a system check and a window is displayed if the system requirements are met.
Setting up an EHB installer:
The following setup window displays. It will guide through the installation of EHANDBOOK-NAVIGATOR.
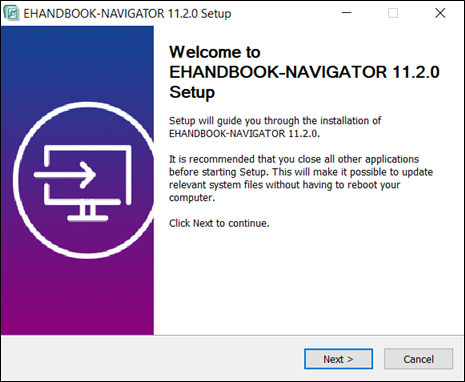
-
Click on
Next.
Choose Install Locationwindow is displayed.
Define Installation Location:
In the Choose Install Location window, you must specify the path for the installation of EHANDBOOK-NAVIGATOR.
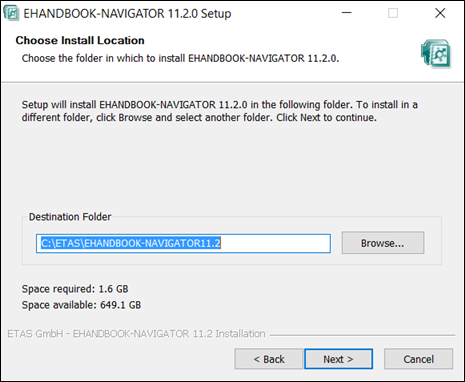
-
If you want to change the preset directory, click the Browse button.
-
In the dialog window, select another directory and click
OK.
If you specify a directory that does not exist, it is created automatically. -
Click on
Next.
Choose Start Menu Folderdialog box is displayed.
Choose Start Menu Folder for the Shortcut to create:
You can specify the path to create the EHANDBOK-NAVIGATOR’s shortcut. If it is not specified, it will be created as ETAS/EHANDBOK-NAVIGATOR 14.0.

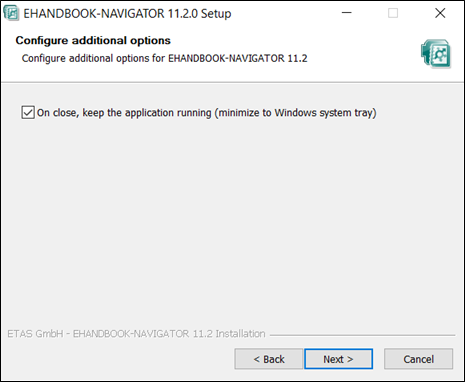
Configure to minimize to Windows system tray:
In the Configure additional options window, you can check the checkbox to keep
the application running i.e. when you close EHANDBOOK-NAVIGATOR, it is still
available and visible in the Windows System Tray. If it is not selected the application will exit on close.
Install EHANDBOOK-NAVIGATOR:
The next step starts the installation. A progress indicator shows how the installation is executing.
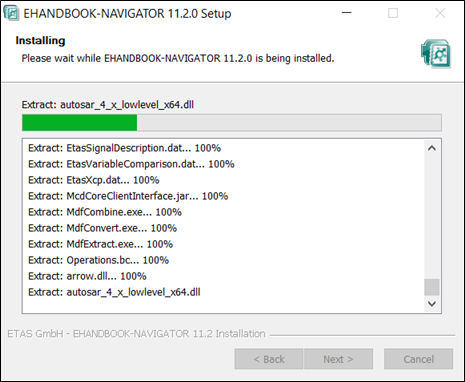
-
Click on
Next.
Completing EHANDBOOK-NAVIGATOR 14.0 Setupdialog box is displayed
Complete the installation:
Once all components have been installed successfully, you are prompted to complete the installation.
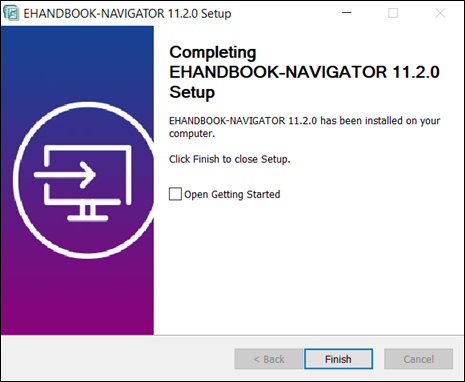
-
Click on
Finishto complete the installation.
On the Start menu, the EHANDBOOK-NAVIGATOR 14.0 folder, with the following entries, is created in the ETAS program group:
-
EHANDBOOK-NAVIGATOR 14.0
The EHANDBOOK-NAVIGATOR 14.0 program is started. -
Open Getting Started
The Getting started guide of EHANDBOOK-NAVIGATOR is displayed. -
Release Notes
The release notes of EHANDBOOK-NAVIGATOR is displayed. -
Uninstall EHANDBOOK-NAVIGATOR
The uninstall procedure is started (see Uninstall Navigator)
Search for License Management in the search field. The following icon is stored on the desktop of your workstation:
|
If an error occurs during EHANDBOOK-NAVIGATOR installation, refer to the section Installation Error Codes to resolve the issue. |
Customization of Installation
Silent Installation
A silent installation of EHANDBOOK-NAVIGATOR may be invoked by executing the installer from the command line and by specifying additional parameters (see table below).
Command Line Arguments for Silent Installation/Uninstallation:
| Installation Scenario | Command |
|---|---|
Silent installation through command line |
Note: |
Silent uninstall through command line |
Note: |
|
If an error occurs during the installation of EHANDBOOK-NAVIGATOR, you can refer to the section: Installation Error Codes in the Getting Started manual to resolve the issue. |
Customization of Installation Directory Path
Customizing the installation directory is just an additional parameter:
´EHANDBOOK-NAVIGATOR_14.0.0_setup.exe /S /D=C:\Custom\EHANDBOOK-NAVIGATOR14.0´
|
Customization of High Screen Resolution
Enabling the high screen resolution setting by making it as true as shown below:
/EnableSystemDPIAwareness=true
Customization of License Configuration File
Customizing the license configuration file by mentioning the path to the licensing.ini file:
/LicenseConfigurationFile=<Path to Licensing.ini>
Example:
/LicenseConfigurationFile=D:\licensing.ini
Customization of Minimizing EHANDBOOK-NAVIGATOR to System Tray
The Product can be exited without getting minimized to system tray by making it as false as shown below:
/MinimizeToTray=false
Customization of EHANDBOOK-NAVIGATOR default log path
The /DefaultLogPath=<path/to/directory> option sets the root folder for
the log files generated during installation of other ETAS products which get
installed along with EHANDBOOK-NAVIGATOR (For example: The ETAS license
manager installed along with EHANDBOOK-NAVIGATOR). The value can be the
name of an existing folder or if the path is not existing, it is created during the first
setup.
|
This works only when no other ETAS product has set this value before. |
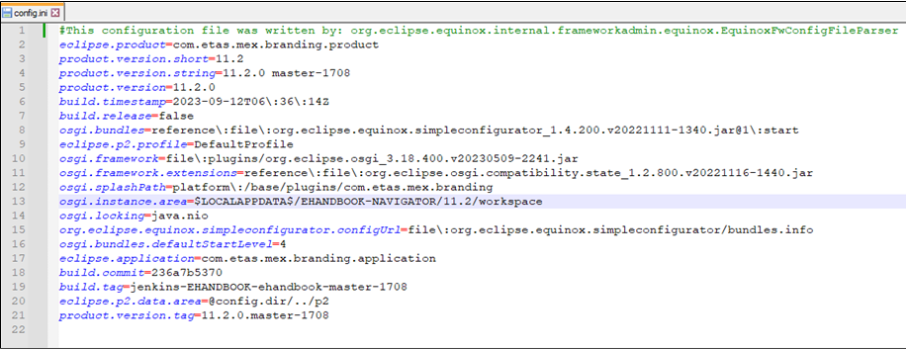
Customization of Workspace Location
The location of the workspace used by EHANDBOOK-NAVIGATOR can also be customized after the installation by modifying the configuration\config.ini file in the
installed directory.
Note that the changes made to config.ini will be effective only after restarting the
product.
To specify a custom workspace location, the value for the “osgi.instance.area” argument in the .ini file should be modified.
Example:
-
osgi.instance.area=C:\\custom_install_dir\\EHANDBOOK-NAVIGATOR
OR
-
osgi.instance.area=C:/custom_install_dir/EHANDBOOK-NAVIGATOR
|
Uninstallation will not automatically clean the workspace, if the workspace location has been customized. The installer assumes the workspace to be located in the default location. |
Customizing EHANDBOOK-NAVIGATOR to display in System Tray
The Product can be customized such that when you close EHANDBOOK-NAVIGATOR, it is still available and visible in the Windows System Tray.
This can be done by adding the command, -DMinimizeToTray=True to the
EHANDBOOK-NAVIGATOR.ini file which is available in the EHANDBOOK-NAVIGATOR installation directory.
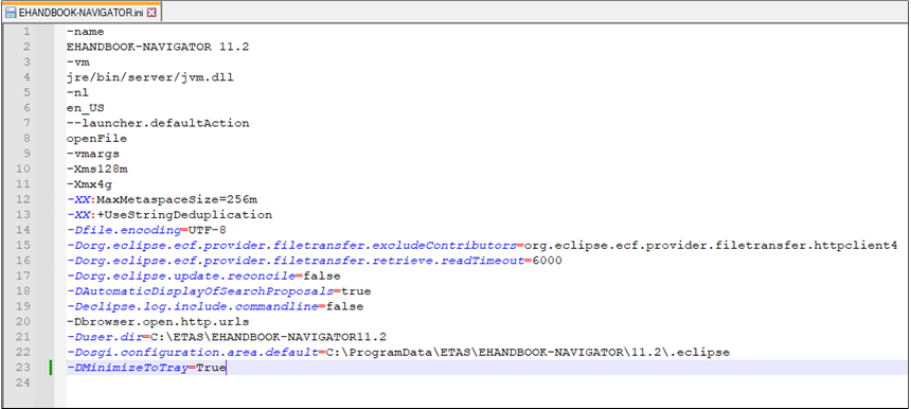
|
The changes made to EHANDBOOK-NAVIGATOR.ini file will be effective only after restarting the product. |
Uninstall Navigator
You can uninstall the EHANDBOOK-NAVIGATOR product by the following method:
Select Add/Remove Programs or Programs and Features in the Control
Panel. Select EHANDBOOK-NAVIGATOR 14.0 and click Uninstall/Change.
To Uninstall EHANDBOOK-NAVIGATOR:
-
Start the uninstall procedure. The Windows Installer executes the uninstall process.
-
Follow the instructions displayed on the window and confirm each window by clicking
Next.
|
After the uninstallation, if you find any folder starting with com.etas.mex created in the user’s directory e.g., C:\Users\<UserId>\.eclipse or in the programm data e.g., C:\ProgramData\ETAS\EHANDBOOK-NAVIGATOR\{navigator-version}\.eclipse
it can be safely removed. |
|
If an error occurs while uninstalling EHANDBOOK-NAVIGATOR refer to the section Installation Error Codes to resolve the issue. |
Licensing the Software
To be able to work with an ETAS software product, you require a license. This section contains basic details on this subject.
Details concerning the scope of the licenses and other legal aspects can be found in "Terms and Conditions".
ETAS License Models
There are three different license models available for licensing your ETAS software:
Machine-Named License, Local
-
A license of this type is managed by the user him/herself.
-
As it is linked to a particular PC.
-
When you change your PC, you require a new license.
User-Named License, Server-Based
-
The licenses (of a department or company) are managed centrally on a server by a designated person.
-
The license is linked to the user name with which the user is registered in the network and is available on every PC in the network.
-
If the relevant PC is disconnected from the network, the license can be "borrowed".
License Features Overview
The following table provides an overview of the EHANDBOOK-NAVIGATOR license features.
|
To be able to start EHANDBOOK-NAVIGATOR, either the EHANDBOOK_NAVIGATOR or the EHANDBOOK_NAVIGATOR_BASIC license is required. |
| License Feature | Description |
|---|---|
EHANDBOOK_NAVIGATOR |
Main application, enables most of the features |
EHANDBOOK_NAVIGATOR_AUTOSAR_CL |
Add-on that enables AUTOSAR related features in EHANDBOOK-NAVIGATOR |
EHANDBOOK_NAVIGATOR_BASIC |
Enables EHANDBOOK-NAVIGATOR Basic mode with a limited feature set |
EHANDBOOK_NAVIGATOR_CANAPE |
Add-on that enables CANape interoperability features in EHANDBOOK-NAVIGATOR |
EHANDBOOK_NAVIGATOR_VISION |
Add-on that enables ATI Vision interoperability features in EHANDBOOK-NAVIGATOR |
EHANDBOOK_NAVIGATOR_COMPARE |
Add-on that enables the Compare functionality in EHANDBOOK-NAVIGATOR |
How to get a License
If your company has a tool coordinator and server-based license management for ETAS software, contact this person. Otherwise (in the case of a machine-named license) you obtain your license from the ETAS license portal (the URL is shown on your Entitlement Certificate). There are three ways of logging in on the welcome page:
-
Activation ID
Once you have logged in, a specific activation is visible and can be managed-
the activation ID is shown on your Entitlement Certificate.
-
-
Entitlement ID
All activations of the entitlement are visible and can be managed (e.g. for a company with just one entitlement). -
E-mail and password
All activations of entitlements assigned to the user account are visible and
can be managed (e.g. for a tool coordinator responsible for several entitlements).
If you need help in the portal, click the Help link.
What Information is required?
Information on the hosts must be entered to activate licenses:
-
Machine-named license
The MAC address of the Ethernet adapter to which the license is to be bound is required here. -
User-named license
Here, you need a server host or a server triad as well as a user name. -
Concurrent (floating) license
Here, you need a server host or a server triad.
|
If this data changes (e.g. due to changes in the hardware or a change of user), the license must be given a "rehost". This procedure is also described in the portal help file. |
The License File
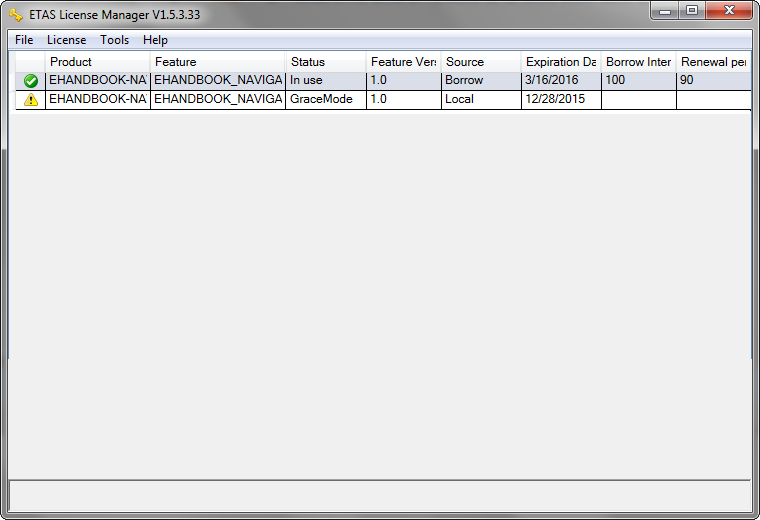
To check license status
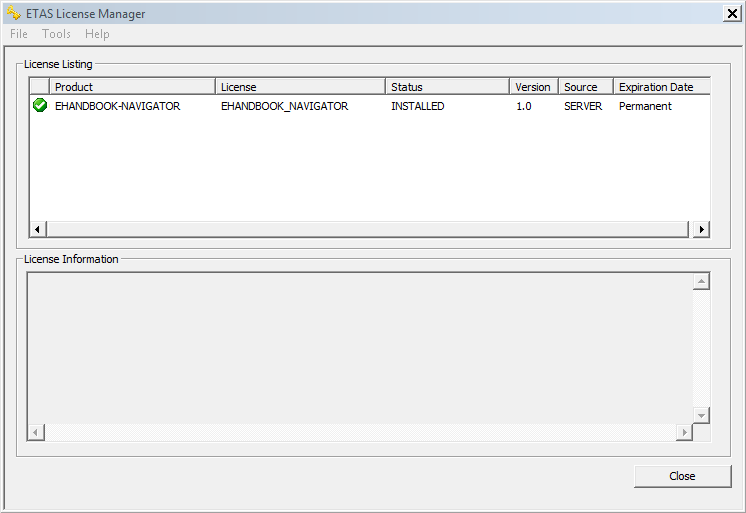
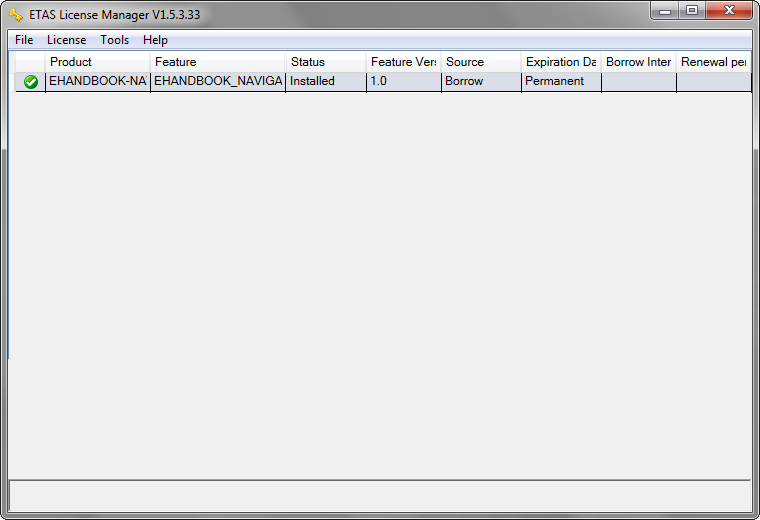
In the Windows Start menu, select ETAS → ETAS License Manager.
The ETAS License Manager contains one entry for each installed product.
The symbol at the beginning of the entry and the "Status" column entry indicate whether a valid license has already been obtained or not.
To add a license file
Open the ETAS License Manager and select File → Add license file.
The Add license file dialog window opens.
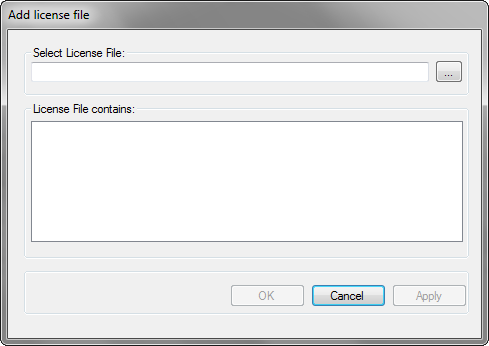
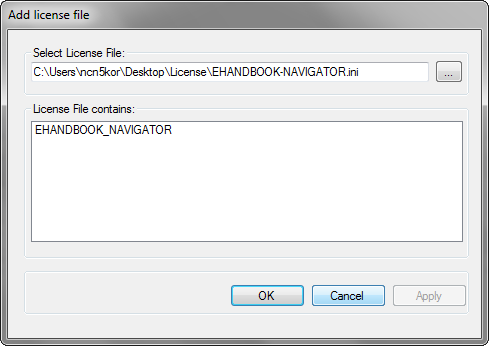
Next to the Select License File field click the … button.
In the file selection window, select the license file and click Open.
The Install License dialog window shows information on the selected
license.
|
The "Version" column shows the version number of the license, not the version number of the software. |
Confirm with OK.
The license just added is now listed in the ETAS License Manager. A green
symbol before the entry shows that the license is valid.
|
If the green symbol is not displayed, there might be a problem with the license file or the license relates to another product. Additional information on the ETAS License Manager can be found in the online help of the ETAS License Manager. |
Close the ETAS License Manager.
|
EHANDBOOK-NAVIGATOR does not support Grace mode. |
Request an Evaluation License
If you have not added a license file in the License Manager, you cannot work with the EHANDBOOK-NAVIGATOR product. You need to obtain a valid license file to operate it. You can send a mail to ETAS sales (see ETAS Contacts) to obtain an Evaluation License. ETAS sales will generate an evalua- tion license and send it to you which will be valid for another 3 months of time.
Basic Mode
If you have not yet installed a license after the expiry, you can still operate the soft- ware with a few features disabled by obtaining a basic mode license; it then runs in what is referred to as basic mode. The window shows the warning message dis- played in this mode.
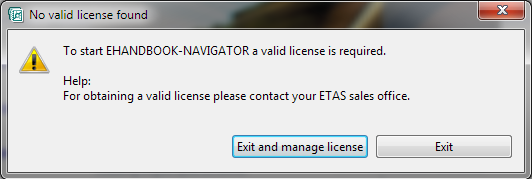
Click Exit and manage license to open the ETAS License Manager and install a
valid license file. As soon as you have installed a valid license, you can continue to
operate the ETAS software in normal operating mode.
Click Exit to close the dialog box and exit the ETAS software.
The "License expires soon" Window
If your installed license runs out in the next 30 days, a warning is shown when you open the ETAS software.
The License expires soon window shows you the number of days left for the
license to expire. The following warning messages are displayed indicating the
expiration of license in 23 days, 1 day, and next day.
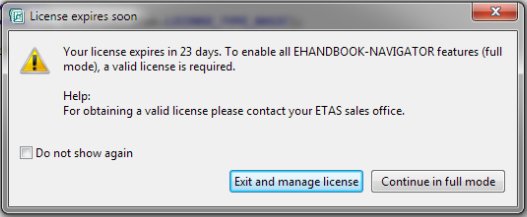
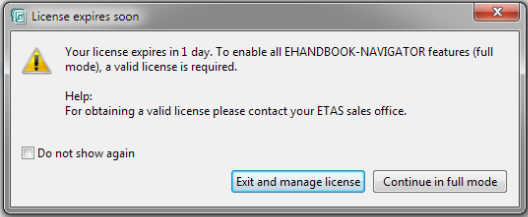
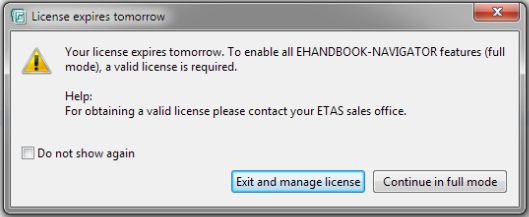
Click Exit and manage lincense to open the ETAS License Manager and install a
valid license file. As soon as you have installed a valid license, you can continue to
operate the ETAS software in normal operating mode.
Select Do not show again to stop displaying the License expires soon dialog box.
Click Continue in full mode to close the dialog box and start the ETAS software.
Once this phase is over, you can continue to use the ETAS software with a few features disabled in what is referred to as Basic Mode (see Basic Mode). All functionalities of the ETAS software are available only when a new or updated license file is installed.
Borrowing a License
The borrowing mechanism makes it possible to work offline even when using a server-based license (i.e. without being connected to the license server).
|
You can only borrow a license if a server-based license is being used! |
To borrow a license, proceed as follows:
To borrow a license:
-
Make sure the ETAS software that you want to borrow the license for is not open.
-
Select the license you want to borrow in the "License Listing" table of the ETAS License Manager.
-
Select
License → Borrow selected licenses.
<Or> -
Select
License → Borrow all licenses.
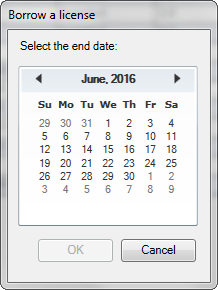
The Select Borrow end date dialog box opens.
-
Select the date until which you want to borrow the license from the calendar displayed and click
OK.
The text in the "Source" column of the ETAS License Manager changes from "SERVER" to "BORROW", and the expiration date of the borrowed license is displayed.
You can now use the relevant ETAS software offline until the expiration date of the borrowed license has been reached.
If you want to use the ETAS software longer than you had originally planned, you
can borrow the license again. If you stop using the ETAS software earlier than
planned, you can return the license to the license server early.
(License → Return selected licenses <or> License → Return all licenses). A
borrowed license can only be returned by the person who borrowed it; it cannot be
returned by another person.
Getting Started
This chapter is aimed at helping new users in getting started with EHANDBOOK- NAVIGATOR.
Application Lifecycle
This section describes the life cycle of EHANDBOOK-NAVIGATOR.
WINDOWS® 11:
-
On the Desktop, double-click
EHANDBOOK-NAVIGATOR 14.0icon.
<Or> -
Search EHANDBOOK-NAVIGATOR in the search field and select
EHANDBOOK-NAVIGATOR 14.0.
<Or> -
Go to
All apps → ETAS → EHANDBOOK-NAVIGATORfolder and click onEHANDBOOK-NAVIGATOR 14.0icon, if it is pinned on theStartMenu.
You can also launch the product by double-clicking on an EHANDBOOK Container (.ehb), or EHANDBOOK Project (.ehbp), or Encrypted EHANDBOOK container (.ehbcrypt).
|
The support of Windows 7, 8.1 and 10 is officially stopped from ETAS GmbH and Microsoft®. |
Close Navigator
EHANDBOOK-NAVIGATOR can be closed by the following ways:
-
Click
 icon on the top-right corner of the EHANDBOOK-NAVIGATOR.
<Or> -
On the
Filemenu, clickClose.
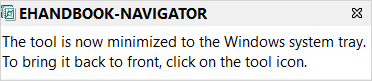
The EHANDBOOK -NAVIGATOR is sent to the Windows System tray with a notification.
Open an instance running in the background
A closed EHANDBOOK-NAVIGATOR can be restored in the following ways:
-
Click icon on the Windows System tray.
<Or> -
Right-click on the EHANDBOOK-NAVIGATOR icon on the Windows System
tray and click Open.
The instance which is running in the background is restored.
|
Even if the previous instance is closed it will be still running in the back- ground. When a new instance is launched, it will restore the instance which is running in the background. |
Create an EHANDBOOK project
An EHANDBOOK project can contain one or more containers. The created project will be saved as .ehbp format. To create a new EHANDBOOK project:
-
Load one or more containers.
-
On the File menu, click Save As…
Save Aswindow is displayed. -
Enter the name for an EHANDBOOK project.
An EHANDBOOK project is created with <filename>.ehbp format.
Load an EHANDBOOK file or a project
An EHANDBOOK file contains documentation information such as text, structures and interactive models that you can access using EHANDBOOK- NAVIGATOR. You can load the EHANDBOOK files which have the file extension of .ehb, .ehbcrypt, or .ehbp formats.
To Load an EHANDBOOK file:
-
On the File menu, select
Open.
Select Filedialog box is displayed. Select the file and clickOpen.
<Or> -
Click
Openbutton in the toolbar.
Select Filedialog box is displayed. Select the file and clickOpen.
<Or> -
Press
<CTRL + O>.
Select Filedialog box is displayed. Select the file and clickOpen.
Supporting of multiple EHANDBOOK files
EHANDBOOK-NAVIGATOR also supports to load and combine multiple EHANDBOOK files. In order to work with EHANDBOOK-NAVIGATOR easily with all the content, more than one EHANDBOOK container can be added to an EHANDBOOK project.
Manage Project feature in the File menu helps you to load one or more EHANDBOOK containers.
To load the container(s):
-
On the File menu, click
Manage Project…
Manage EHANDBOOK Projectdialog box is displayed.-
Click
Add EHANDBOOK File(s)…
Select EHANDBOOK File window is opened to select the EHANDBOOK file(s). -
Select the file(s) which is(are) of *.ehb or *.ehbc extensions. You can choose one or more file at a time.
-
Click
Opento load the selected file(s).
The selected file(s) are displayed in theManage EHANDBOOK Projectdialog box.
-
Keyboard Shortcuts
| Shortcut | Function |
|---|---|
<CTRL + F1> |
Displays the Keyboard shortcuts window |
<CTRL + O> |
Opens the EHANDBOOK file or a project |
<CTRL + S> |
Saves the EHANDBOOK file or a project |
<CTRL + SHIFT + S> |
Selects the file to save an EHANDBOOK file or a project |
<CTRL + P> |
Opens the |
<CTRL + C> |
Copies selected content in Bookmarks, Model Viewer and Document Viewer |
<CTRL + V> |
Pastes the copied content |
<CTRL + Z> |
Undoes the last action performed |
<CTRL + Y> |
Repeats the last action performed |
<CTRL + A> |
Marks all content in the Document Viewer, Bookmarks View, Document Explorer View |
<CTRL + H> |
Cursor is placed inside the Search field |
<CTRL + +> |
Zoom In |
<CTRL + - > |
Zoom Out |
<CTRL + 0> |
Zoom to 100% |
<SPACE> |
Fits the entire interactive model in the Model Viewer |
<ESC> |
Navigate out in the Model Viewer |
<CTRL + I> |
Switches to Model Explorer View |
<CTRL + D> |
Switches to Document Explorer View |
<CTRL + B> |
Switches to Bookmarks View |
<CTRL + PG UP> |
Switches between Model Viewer, Document Viewer, and Document Explorer View, Only available when one of Document Explorer View, or Model Explorer View, or Bookmarks View is selected. In general, it sSwitches between all the three views |
<CTRL + PG DN> |
Switches between Model Viewer, Document Viewer, and Document Explorer View, Only available when one of Document Explorer View, or Model Explorer View, or Bookmarks View is selected. In general, it sSwitches between all the three views |
<CTRL + F8> |
Switches between Content, Extended and Personal perspectives |
<ALT + F> <O> |
Opens a new container |
<ALT + F> <I> |
Imports Bookmark or Comments |
<ALT + F> <E> |
Exports Bookmark or Comments |
<ALT + F> |
Expands the File menu |
<ALT + F> <X> |
Exits EHANDBOOK-NAVIGATOR |
<ALT + S> |
Expands the Search menu |
<ALT + D> |
Expands the Data menu |
<ALT + V> |
Expands the View menu |
<ALT + V> <P> |
Opens the Reset Perspective dialog box |
<ALT + F> <P> |
Opens the Preferences dialog box |
<ALT + V> <T> |
Hides the Tool Bar |
<ALT + V> <V> |
Opens Show View |
<ALT + V> <F> |
Resizes the EHANDBOOK to the entire screen. Pressing Esc key returns the EHANDBOOK to original size |
<ALT + H> |
Expands the Help menu |
<ALT + H> <H> |
Opens the EHANDBOOK-NAVIGATOR User Guide |
<ALT + H> <S> |
Opens the EHANDBOOK-NAVIGATOR Safety Advice dialog box |
<ALT + H> <L> |
Opens the ETAS License Manager dialog box |
<ALT + H> <A> |
Opens the About EHANDBOOK-NAVIGATOR dialog box |
<ALT + F11> |
Resizes the EHANDBOOK to the entire screen |
<F11> |
Starts running an INCA experiment |
<F9> |
Stops the running INCA experiment |
<CTRL + SHIFT + D> |
Display all values (When connected to INCA or when measurement file loaded) |
<CTRL + SHIFT + H> |
Hide all values (When connected to INCA or when measurement file loaded) |
<CTRL + SHIFT + F> |
Display all values on highlighted paths (When connected to INCA or when measurement file loaded) |
<CTRL + SHIFT + P> |
Step to previous value sample (Model Viewer when measurement file loaded) |
<CTRL + SHIFT + N> |
Step to previous next sample (Model Viewer when measurement file loaded) |
<CTRL + P> |
Displays the Physical values in the Label popup |
<CTRL + B> |
Displays the Binary values in the Label popup |
<CTRL + D> |
Displays the Decimal values in the Label popup |
<CTRL + H> |
Displays the Hexadecimal values in the Label popup |
<CTRL + R> |
Removes signal highlighting in Model Viewer |
<CTRL + ENTER> |
To open multiple tabs from document explorer or bookmarks view or global search result view |
<CTRL + Left mouse click> |
To open multiple tabs from a Label popup or the graphics where the ClickPic feature is enabled |
Local Search Keyboard Shortcuts
Shortcut |
Function |
<CTRL + F> |
Displays the Local Search field |
<F3> |
Opens the Local Search Box. Pressing F3 key again, displays the next search result hit in the Local Search Results View |
<SHIFT + ESC> |
Hides the Local Search field |
<SHIFT + F3> |
Displays the previous search result hit in the Local Search Results View |
Recommendations/Prerequisites
-
EHANDBOOK-NAVIGATOR 14.0 supports interoperability with ETAS INCA V7 needs to be installed on the same PC for EHANDBOOK-NAVIGATOR to support INCA operations.
-
EHANDBOOK container must be obtained from a publisher.
-
Sometimes, some of the containers are not visible when the zoom level is set to 175%. DPI scaling factor adjustment" in silent mode installation
Restrictions
-
ASCET State machines, ESDL and C-Code components are not supported in the Model Viewer. CT-blocks and AUTOSAR-specific blocks are also not supported.
-
EHANDBOOK-NAVIGATOR will not allow you to add the containers in the following cases:
-
If the selected container was already added into a project.
-
If the container is already loaded and renamed, then you try to load the same container, even though the container is renamed.
-
-
Connecting from MDA 8 for measuring data
-
Connecting from MDA 8 is not possible with the basic license of MDA8. It is possible only with the full license.
-
There is no indication that the cursor value sent from MDA 8 to EHB changed manually when a point in time of a MDA 8 cursor sent to the connected EHANDBOOK-NAVIGATOR.
-
When you open a signal documentation in the currently loaded documentation in EHB, there is no check whether the documentation matches, since the signal name is searched globally.
-
Troubleshooting
You cannot install EHANDBOOK-NAVIGATOR if the system requirements are not
met. Refer to System Requirements of EHANDBOOK-NAVIGATOR.
While installing EHANDBOOK-NAVIGATOR, if an error code is shown and the installation is stalled, refer to the next section Installation Error Codes for details and
the relevant action has to be taken.
If the system requirements are fulfilled and you are unable to install
EHANDBOOK-NAVIGATOR, contact ETAS Contacts for assistance.
In case you are unable to install EHANDBOOK-NAVIGATOR and you receive a notification that EHANDBOOK-NAVIGATOR is already installed, contact ETAS Contacts for assistance.
You cannot launch EHANDBOOK-NAVIGATOR, if your workspace is corrupted, contact ETAS Contacts for assistance.
Installation Error Codes
If you get an error while installing/uninstalling EHANDBOOK-NAVIGATOR, the following list of error codes may be helpful to rectify the issue:
Exit-Code |
Description |
110 |
Installation or Uninstallation might stop if you do not have administrative rights on the system. Please contact your system administrator |
220 |
Installation or Uninstallation might stop if the EHANDBOOK-NAVIGATOR instance or LIMA process is running. Please complete that before proceeding with this installation. |
135 |
If the length of the installation path exceeds the maximum 80 characters path length. |
145 |
If the installation directory is not empty (have one or more files besides install log) the installation might stop |