Tutorial: Generate EHB Containers from AUTOSAR (Classic) .arxml files only
Introduction
In this tutorial, you will learn how to create a small EHANDBOOK Container for an AUTOSAR Classic system using the Directory-based EHANDBOOK Container-Build toolchain.
You only need the AUTOSAR .arxml files required for the application software and the EHANDBOOK Container-Build toolchain. No additional tools or files are required.
|
This tutorial requires EHANDBOOK 10.1 or later. |
Let’s get started!
Set Up the Input Data
Before generating an EHANDBOOK Container, organize the project files in the required directory structure.
The input directory should contain:
-
A root directory that is passed to the EHANDBOOK Container-Build toolchain.
-
One or more software component directories.
-
Model files and textual documentation for each software component.
└── 📒 ECU_SW_XYZ
    ├── 📒 SWC_1
    │   ├── 📄 swc_1_model.slx
    │   └── 📄 textual_description.adoc
    .
    .
    .
    └── 📒 SWC_2
        ├── 📄 swc_n_model.slx
        └── 📄 textual_description.adoc
For AUTOSAR Classic projects, EHANDBOOK Container-Build can automatically generate this directory structure from the project’s AUTOSAR .arxml files.
Generate the Directory Structure from AUTOSAR .arxml Files
Use your own AUTOSAR .arxml files, or download the example project:
FlexECU_AUTOSAR_files.zip.
To generate the directory structure:
-
Create a directory named
FlexECU_AUTOSAR_files. -
Copy all AUTOSAR
.arxmlfiles into this directory.
└── 📒 FlexECU_AUTOSAR_files
        ├── 📄 Actuators_Comp.arxml
        ├── 📄 Compositions.arxml
        ├── 📄 FlexECUDemoActuatorSoftwareComponents.arxml
        ├── 📄 FlexECUDemoApplicationSoftware.arxml
        ├── 📄 FlexECUDemoSensorSoftwareComponents.arxml
        ├── 📄 Interfaces.arxml
        ├── 📄 ParameterInterfaces.arxml
        ├── 📄 PlatformTypes.arxml
└── 📄 Sensors_Comp.arxml-
Create an output directory named
FlexECU_Dir_AUTOSAR. EHANDBOOK Container-Build generates the directory structure in this location. -
Run the following command:
C:\Program Files\ETAS\EHANDBOOK-Container-Build_<Version>-Windows\eHandbookCB.exe ^
-i "FlexECU_AUTOSAR_files" ^
-n "FlexECU_Dir_AUTOSAR" ^
-o "FlexECU_Dir_AUTOSAR" ^
-ar2ehbcbinput (1)| 1 | The -ar2ehbcbinput option initializes and generates the EHANDBOOK input directory structure from the AUTOSAR .arxml files. |
After the command completes, the generated directory structure looks like this:
└── 📒 FlexECU_Dir_AUTOSAR      (1)
    ├── 📒 CPT_Afr              (2)
    │   └── 📄 CPT_Afr.adoc     (3)
    ├── 📒 CPT_Ais              (2)
    │   └── 📄 CPT_Ais.adoc     (3)
    .
    .
    .
    ├── 📒 CPT_Wgc              (2)
    │   └── 📄 CPT_Wgc.adoc     (3)
    .
    ├── 📄 Actuators_Comp.arxml (4)
    ├── 📄 Compositions.arxml
    ├── 📄 FlexECUDemoActuatorSoftwareComponents.arxml
    ├── 📄 FlexECUDemoApplicationSoftware.arxml
    ├── 📄 FlexECUDemoSensorSoftwareComponents.arxml
    ├── 📄 Interfaces.arxml
    ├── 📄 ParameterInterfaces.arxml
    ├── 📄 PlatformTypes.arxml
    ├── 📄 Sensors_Comp.arxml
    .
    ├── 📄 ar2ehcbinput.log     (5)
└── 📄 tocs.yaml (6)| 1 | Output directory specified with the -o command-line option. |
| 2 | Directory created for each software component prototype found in the AUTOSAR .arxml files. |
| 3 | Generated AsciiDoc template for documenting the software component. |
| 4 | AUTOSAR .arxml files copied from the input directory. |
| 5 | Log file generated by EHANDBOOK Container-Build. |
| 6 | YAML file used to customize the table of contents. |
For each software component, EHANDBOOK Container-Build creates:
-
A dedicated software component directory.
-
A generated AsciiDoc template for documenting the component.
Example:
= CPT_Afr                          (1)

== Component Overview              (2)

ehbfunctionoverview::CPT_Afr[Component Overview for CPT_Afr] (3)| 1 | Main documentation chapter for the software component. |
| 2 | Section heading. |
| 3 | EHANDBOOK AsciiDoc macro that generates the component overview diagram. |
The generated EHANDBOOK Container provides two table of contents views:
-
Alphabetical View – Displays all atomic software components in alphabetical order.
-
Composition View – Displays the composition hierarchy together with the associated atomic software components.
You can edit the generated tocs.yaml file to customize the table of contents.
For more information, see: Syntax of tocs.yaml.
|
You can further customize the generated directory structure by:
|
Generate the EHANDBOOK Container
After setting up the input data, run the following command to generate the EHANDBOOK Container.
C:\Program Files\ETAS\EHANDBOOK-Container-Build_<Version>-Windows\eHandbookCB.exe ^
-i "FlexECU_Dir_AUTOSAR" ^      (1)
-o "." ^                        (2)
-n "FlexECU_Dir_AUTOSAR" ^ (3)| 1 | Input directory. |
| 2 | Output directory. |
| 3 | Name of the generated EHANDBOOK Container. |
Open the EHANDBOOK Container in EHANDBOOK-NAVIGATOR
Open the generated EHANDBOOK Container in EHANDBOOK-NAVIGATOR.
The Document Explorer shows one entry for each software component. You can use the search filter to quickly find a software component.
Each software component includes:
-
A generated text description.
-
A component overview diagram.
-
A table that lists the ports and their interface elements.
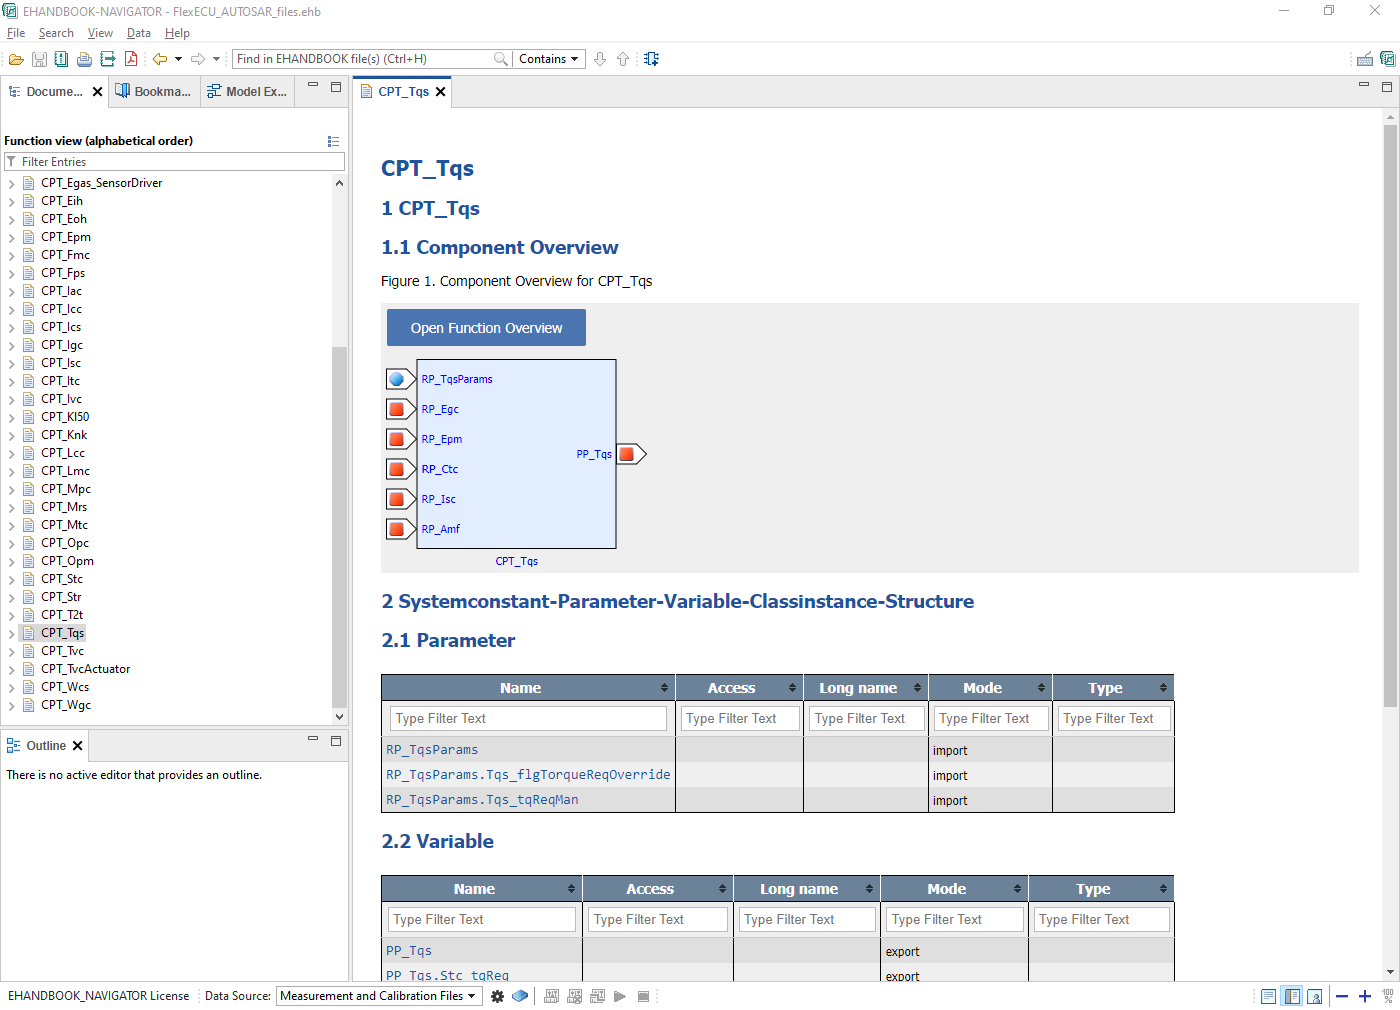
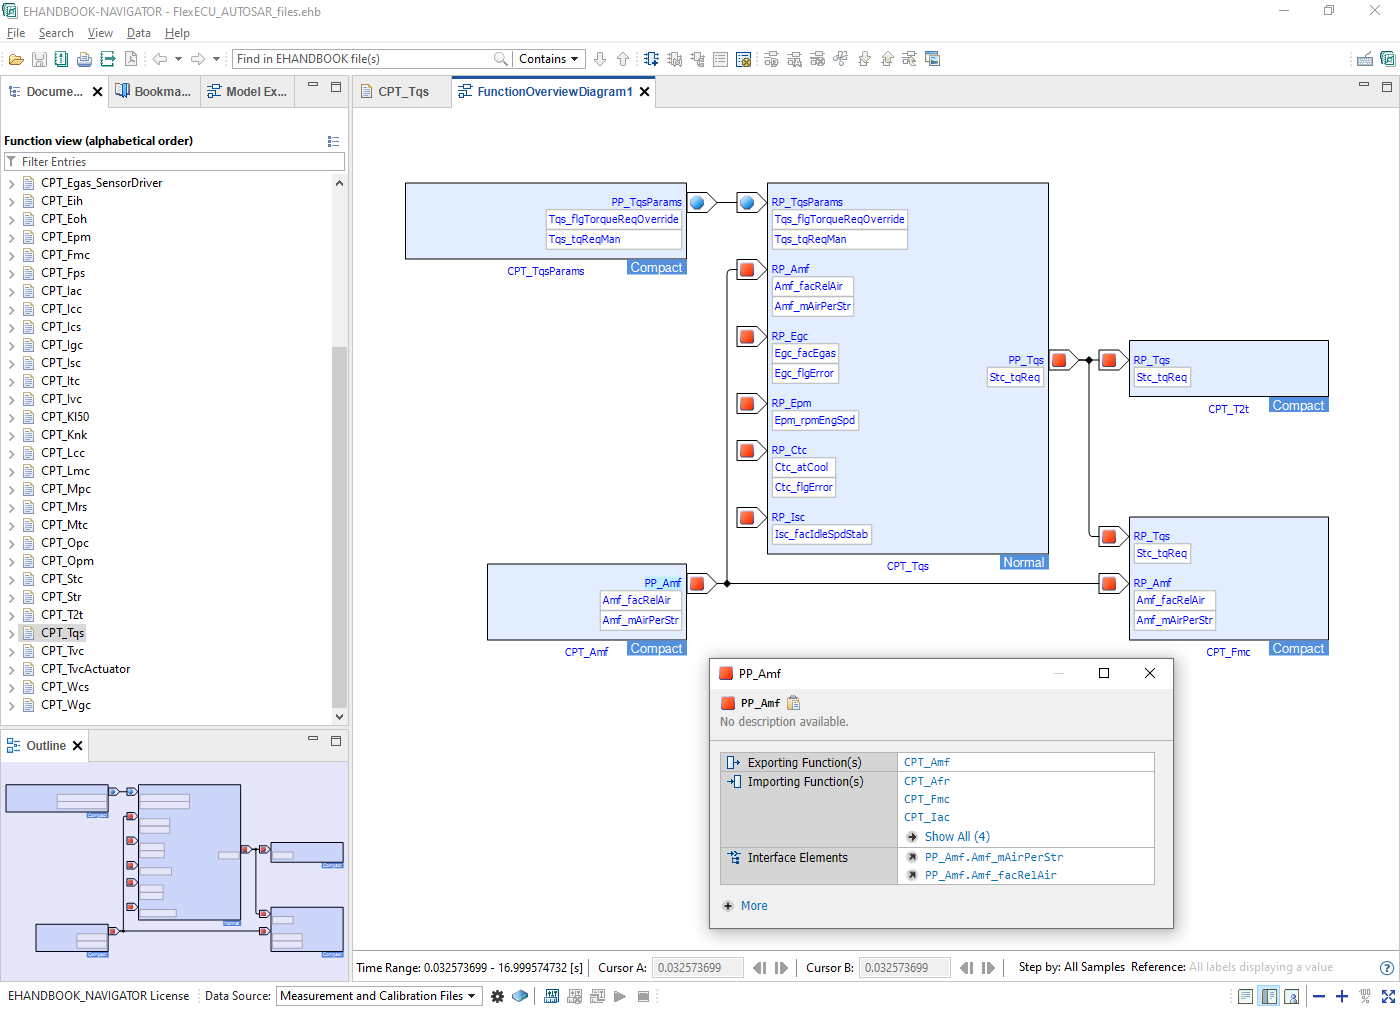
You can also create overview diagrams that show multiple software components and their connections.
To show more interface details, select Show Interface Elements from the toolbar or the context menu.
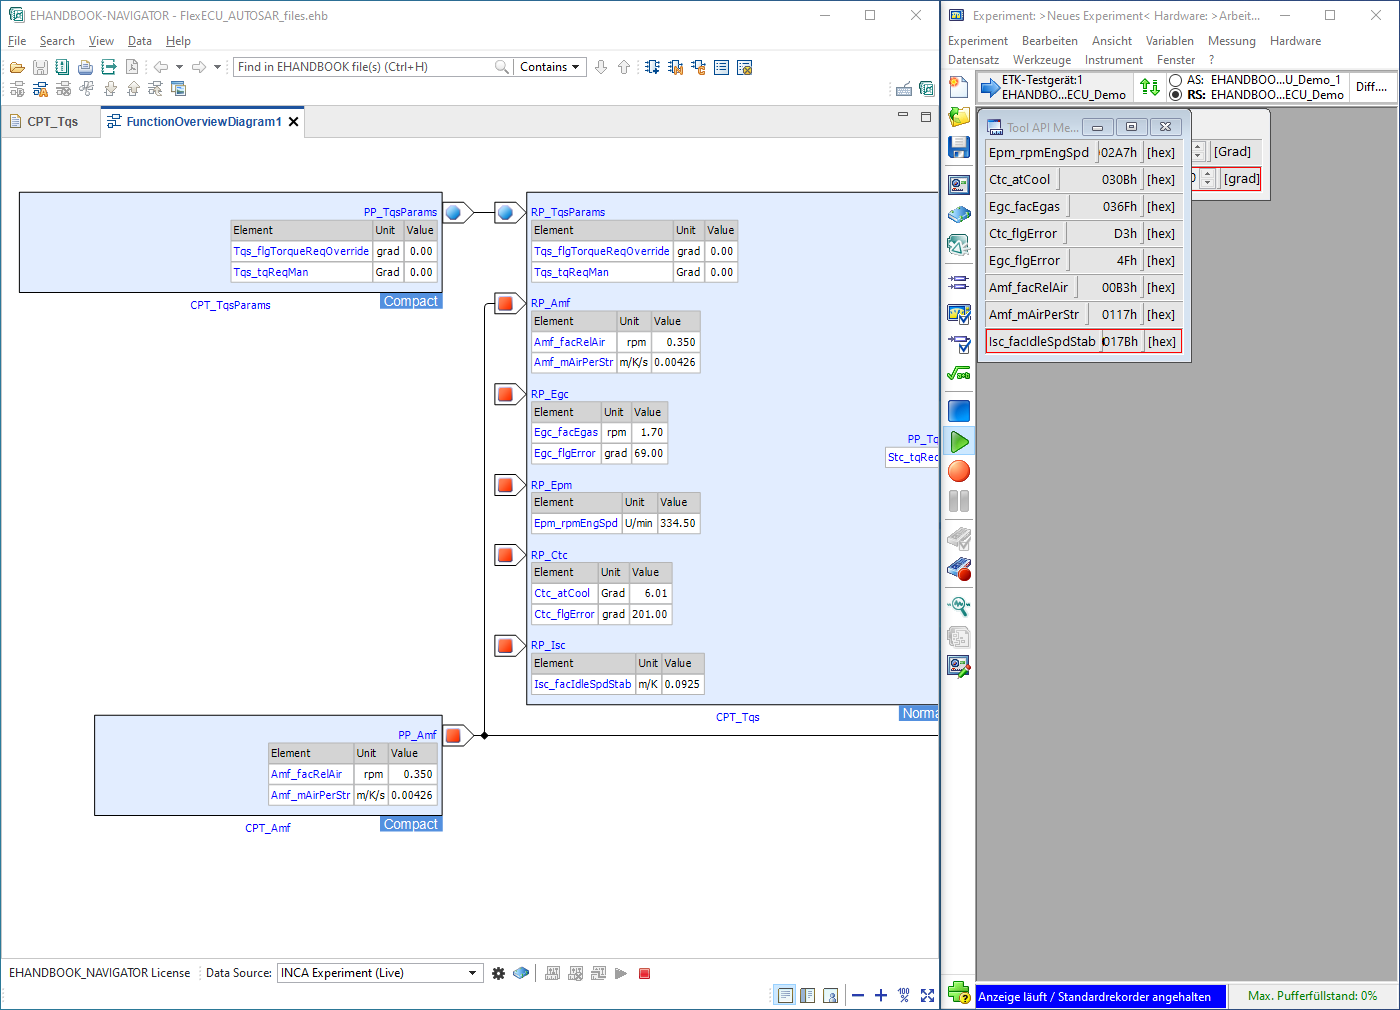
If you connect the overview diagram to an INCA experiment, you can add variables and parameters from Sender/Receiver and Parameter interfaces directly to the experiment.
You can also view live values to better understand the behavior of your AUTOSAR Classic application software.
Summary
Congratulations! You have successfully generated an EHANDBOOK Container for an AUTOSAR Classic project.
You can now:
-
Add ASCET or Simulink models to document the internal behavior of your software components.
-
Update the generated AsciiDoc files with additional documentation and model screenshots using the EHANDBOOK AsciiDoc extensions.
-
Generate a PDF version of your EHANDBOOK Container using the
-pdfcommand-line option. -
Apply your own styling and branding to the EHANDBOOK Container.