AsciiDoc Specification
AsciiDoc Support in EHANDBOOK
AsciiDoc is a plain text markup language used to create technical content. It provides features to organize and reuse content. AsciiDoc content can be created using a text editor, managed with a version control system, and published in different output formats.
AsciiDoc Support
The Directory-based EHANDBOOK Container-Build Tool-Chain includes a converter for AsciiDoc source files. It converts AsciiDoc files into textual and graphical content for EHANDBOOK containers.
|
The following AsciiDoc syntax elements are supported:
Document Titles and Section Levels
A document title in AsciiDoc defines the title of the document. It is usually followed by content such as text, images, lists, and tables. The content can be organized into sections and subsections.
The document title is created using a single = character at the beginning of the first line. Sections and subsections are created using additional = characters.
= Document Header Text (Level 0)

== Level 1 Section Title

=== Level 2 Section Title

==== Level 3 Section Title
|
Text Formatting
Text formatting uses special characters around the text.
The following text styles are supported:
-
Bold text: *bold\*
-
Italic text: italic
-
Superscript text: ^superscript phrase^
-
Subscript text: ~subscript phrase~
Nested formatting is also supported. For example: bold-italic.
Representation in EHANDBOOK-NAVIGATOR:
Formatted text such as *bold\*, _italic\_, superscript phrase, and ~sub\~script phrase are supported. Nested formatting such as *_bold-italic\_\* is also possible.
Lists
Ordered Lists
Ordered lists use the . character at the beginning of a new line.
-
An ordered list can have a list title followed by list elements on separate lines.
-
Each list element starts with a dot (
.).
Representation in EHANDBOOK-NAVIGATOR:
-
Ordered list can have a list title followed by list elements on separate lines.
-
Each list element starts with a dot (
.).
Unordered Lists
Unordered lists use either the - or * character at the beginning of a new line.
-
An unordered list can have a list title followed by list elements on separate lines.
-
An unordered list element starts with a hyphen (
-). -
Alternatively, an unordered list element can start with an asterisk (
*).
Representation in EHANDBOOK-NAVIGATOR:
-
Unordered list can have a list title followed by list elements on separate lines.
-
Unordered list element starts with a hyphen (
-).-
Alternatively, unordered list element can start with an asterisk (
*).
-
A blank line is required before and after a list to separate it from other blocks.
For more information, see [https://docs.asciidoctor.org/asciidoc/latest/syntax-quick-reference/#lists](https://docs.asciidoctor.org/asciidoc/latest/syntax-quick-reference/#lists)
|
EHANDBOOK supports only basic ordered and unordered lists without nesting. |
Description Lists
A description list contains one or more terms and their descriptions.
Basic Description List
Each entry in a description list contains a term or phrase followed by a separator.
Basic Description List Syntax: using ::
Terms :: Description or definition of the itemExample of a Basic Description List:
Term1::

Description with line break.

Term2:: Description without line break.
Representation in EHANDBOOK-NAVIGATOR:
- Term1
-
Description with line break.
- Term2
-
Description without line break.
Nested or Mixed Lists
A description list can contain other description lists, ordered lists, and unordered lists. The term separator changes from :: to ::: for a nested description list.
Term1::

  * List element 1

  * List element 2

Term2::

  Nested Term:::

    . List element 1 of Nested Term

      * Nested list element 1

      * Nested list element 2

    . List element 2 of Nested Term

      * Nested list element 1

Term3::

  NOTE: Description mixed with NOTE block.
Representation in EHANDBOOK-NAVIGATOR:
- Term1
-
-
List element 1
-
List element 2
-
- Term2
-
- Nested Term
-
-
List element 1 of Nested Term
-
Nested list element 1
-
Nested list element 2
-
-
List element 2 of Nested Term
-
Nested list element 1
-
-
- Term3
-
NOTE: Description mixed with NOTE block.
Tables
A table with a title uses the following syntax:
.Table title

|===

|TableHead1 |TableHead2 |TableHead3

|Cell in column 1, row 1
|Cell in column 2, row 1
|Cell in column 3, row 1

|Cell in column 1, row 2
|Cell in column 2, row 2
|Cell in column 3, row 2

|===
Representation in EHANDBOOK-NAVIGATOR:
TableHead1 |
TableHead2 |
TableHead3 |
Cell in column 1, row 1 |
Cell in column 2, row 1 |
Cell in column 3, row 1 |
Cell in column 1, row 2 |
Cell in column 2, row 2 |
Cell in column 3, row 2 |
For more information, see https://docs.asciidoctor.org/asciidoc/latest/syntax-quick-reference/#tables
|
EHANDBOOK supports standard and advanced AsciiDoc table layouts, including merged rows, merged columns, combined row and column spans, and nested tables. EHANDBOOK-NAVIGATOR automatically adds sortable headers and a filter line for supported table layouts. Complex merged table structures may have limitations for advanced interactive operations such as sorting and filtering. |
Advanced Tables
EHANDBOOK also supports advanced AsciiDoc table layouts, including:
-
Merged columns using colspan syntax
-
Merged rows using rowspan syntax
-
Combined row and column spans
-
Nested tables inside table cells
-
Custom table styling using roles and CSS
Example for merged columns:
|===

|A |B |C

2+|Merged Column

|C2

|===
Example for merged rows:
|===

|A |B |C

.2+|Row Span

|B2
|C2

|B3
|C3

|===
Example for nested tables:
|===

|Outer Cell

a|

[cols="1,1"]

!===

!Nested A !Nested B

!1 !2

!===

|===
Representation in EHANDBOOK-NAVIGATOR:
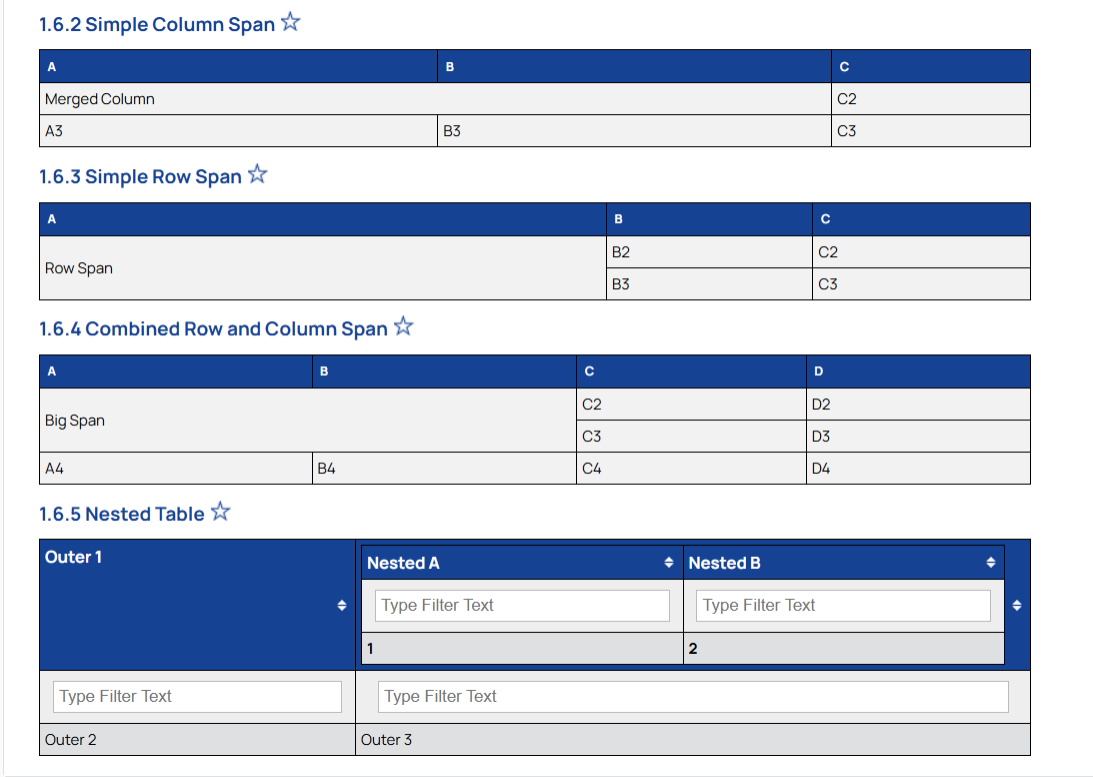
-
Merged rows and columns are preserved during rendering.
-
Nested tables are rendered inside parent tables.
-
Combined row and column spans are supported without losing the table structure.
Images
Images can be embedded in AsciiDoc documentation. In EHANDBOOK, model screenshots can be linked to interactive models by providing the model path.
Embed Pre-generated Images
An image must be placed in the same folder as the AsciiDoc documentation or in a subfolder of the AsciiDoc documentation. In both cases, the path must be relative to the AsciiDoc documentation.
Syntax:
image::VectorImage.svg[]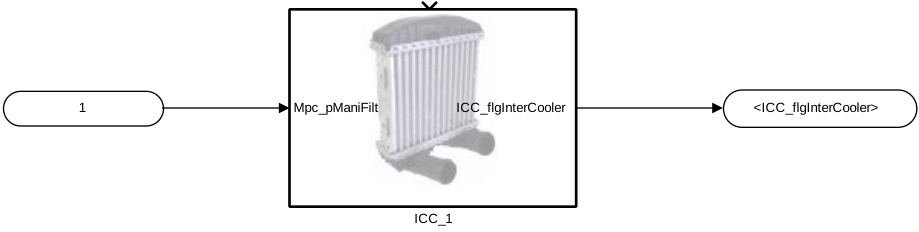
|
Pre-generated images in SVG, JPG, and PNG formats are supported. SVG images are partially supported in PDF generation. Refer to Known Issues for more details. |
Pre-generated Images Linked to Models
A pre-generated image can also be linked to its corresponding interactive model hierarchy in EHANDBOOK-NAVIGATOR.
Syntax:
image::image_name.svg[link=ehbmodelref:model_path]EHANDBOOK-Generated Model Screenshots Linked to Interactive Models
EHANDBOOK Container-Build can generate screenshots of model layers, such as ASCET diagrams or hierarchies and Simulink subsystems, and link them to the interactive model in EHANDBOOK-NAVIGATOR.
Syntax: ehbmodelref::model_path[image_title]
EHB-Generated Function Overview Image
Syntax for one function:
ehbfunctionoverview::function_name[title]
ehbfunctionoverview::Documentation[Title Name]
Syntax for multiple functions:
ehbfunctionoverview::function1_name[title],function2_name[title]
Syntax for all functions in the container:
ehbfunctionoverview-all::[title]
If the target contains leading, trailing, or in-between spaces, enclose the target in quotation marks.
Syntax for multiple functions:
ehbfunctionoverview::" function1_name,function2_name "[title]
Include Files
Include Other AsciiDoc or Source Files
Content from another AsciiDoc file or another file format can be included in the current AsciiDoc document.
|
Syntax for including files:
include::_fileName.extension[]
include::./../../include/_anotherFile.asciidoc[]This content comes from the adoc file _anotherFile.asciidoc:
Lorem ipsum dolor sit amet, consectetuer adipiscing elit. Aenean commodo ligula eget dolor. Aenean massa. Cum sociis natoque penatibus et magnis dis parturient montes, nascetur ridiculus mus. Donec quam felis, ultricies nec, pellentesque eu, pretium quis, sem. Nulla consequat massa quis enim. Donec pede justo, fringilla vel, aliquet nec,
Include Formatted Source Code, e.g. C Code
Syntax for including source files:
include::filename.extension[]Representation in EHANDBOOK-NAVIGATOR:
/*****************************************************************************************************
 * Header File #includes
 ****************************************************************************************************/
#include "adb.h"

/*****************************************************************************************************
 * Function:	DECU
 * Description: Filter ECU-internal ambient air pressure value
 ****************************************************************************************************/
void DFiltered(void)
{
	int a = 0;
	int b = 4;
	int c = a + b;
}|
Syntax highlighting is not supported in EHB. |
Links
AutoLink
AsciiDoc automatically recognizes the following common URL schemes:
-
http/https
-
file
-
mailto
-
ftp
-
irc
The following HTTPS URL is automatically converted into a hyperlink:
The EHANDBOOK homepage at https://www.etas.com/ehandbook
A link to an external file works as follows:
file://../input/Documentation/asciidoc-user-document.adocA link to a network file works as follows:
file://sample.com/sample/sample/sample.adocClicking any of the above links opens the file with the associated tool outside EHB-NAV.
AsciiDoc also detects and automatically links standard email addresses:
Email us at sales.de@etas.com for any inquiries.
|
Only absolute file paths are supported in EHANDBOOK. |
Customize Link Text
You can customize the text displayed for a link by adding text or parameters inside square brackets.
Customize URL and File Link Text
Instead of displaying the link itself, you can display alternative text.
Add the text between the square brackets at the end of the URL.
https://etas.com/ehandbook[Show Homepage]This is displayed as:
You can also apply formatting to the link text.
For a file link:
file://../input/Documentation/asciidoc-user-document.adoc[AsciiDoc Source]The following text is displayed:
Customize Mailto Text
For mailto links, two parameters are used inside the brackets. The first parameter defines the text displayed as the link.
The second parameter defines the text that appears in the subject field of the mail program.
mailto:sales.de@etas.com[Contact ETAS,Request for Quotation]If you want to leave the linked text blank and use the email address instead, start the attribute list with a comma.
mailto:sales.de@etas.com[,Request for Quotation]Link Macro
The general link syntax is <attrlist>.
The link macro is required when the link does not start with a scheme recognized by AsciiDoc.
It is also required when the link contains spaces. In this case, encode spaces as %20 or .
Customize <target> to support model or function overview links.
Support Model Links
Syntax for model links:
ehb:model:://FCName/model_path
| Key | Description |
|---|---|
ehb: |
Mandatory |
model: |
Mandatory for model links |
FCName |
Optional and used for inter-FC model links |
model_path |
Model hierarchy path starting from the project to a hierarchy |
Example for inter-FC model link:
link:ehb:model://A_C_Afr/AirFuelRatio_Project/Main/AirFuelRatio/Main[link to ASET Afr model]
|
The target link contains the FC name. This link can be used across FC documentation. |
Example for intra-FC model link:
link:ehb:model:/AirFuelRatio_Project/Main/AirFuelRatio/Main[link to ASET Afr model]
|
The target link does not contain the FC name. This link can be used within FC documentation for linking. |
Support Function Overview Links Using the Link Macro
Syntax for function overview links:
ehb:functionoverview:/?functions=function1,function2
| Key | Description |
|---|---|
ehb: |
Mandatory |
functionoverview: |
Mandatory for function overview links |
?functions=(key) |
Mandatory |
function1,function2(values) |
Allowed valid single or multiple functions |
Example for single-FC function overview link:
link:ehb:functionoverview:/?functions=CPT_Amf[link CPT_Amf]
Example for multiple-FC function overview links:
link:ehb:functionoverview:/?functions=CPT_Amf,CPT_Afr[link CPT_Amf and CPT_Afr]
Note: If multiple function names are provided as input, separate them with commas (,).
link:../input/Documentation/asciidoc-user-document.adoc[AsciiDoc]This is displayed as:
|
The link above is for demonstration purposes only and does not provide any functionality. |
Support Cross References Using the Link Macro
A cross reference is a link to another location in the current AsciiDoc document or another AsciiDoc document.
To create a cross reference, define the location to which the reference points.
Use the inline link macro to create the reference.
Syntax for cross references:
ehb:text://fcName/sectionTitle1/sectionTitle2[displayText]
| Key | Description |
|---|---|
ehb: |
Mandatory |
text: |
Mandatory for cross-reference links |
Linking Within the Same AsciiDoc File
The link macro is used to create a cross reference to a section with a title in the same document.
Syntax:
For example, if an AsciiDoc document in the FC Afr contains a section called Introduction, the reference can be written as:
Linking Between Different AsciiDoc Files
The link macro can also be used to create a cross reference to a section with a title in another AsciiDoc document.
Syntax:
For example, an AsciiDoc document in the FC Sensor contains a section called Variables. This section can be referenced from another AsciiDoc document in the FC Actuator as follows:
|
Support for xref has been deprecated in EHANDBOOK since version 13.0. Use the link macro instead. |
Diagrams
Support for Asciidoctor Diagrams in EHANDBOOK enables plain-text diagrams embedded in an AsciiDoc document to be rendered during the Asciidoctor conversion process.
The following types of diagrams are supported in EHANDBOOK:
-
Formulas
-
UML graphics
Formulas
Simple Formula
[plantuml,default]

....

@startmath

f(t)=(a_0)/2 + sum_(n=1)^ooa_ncos((npit)/L)+sum_(n=1)^oo b_n\\ sin((npit)/L)

@endmath

....
Scale Formula to 1.5
[plantuml,scale1_5]

....

@startmath

scale 1.5

f(t)=(a_0)/2 + sum_(n=1)^ooa_ncos((npit)/L)+sum_(n=1)^oo b_n\\ sin((npit)/L)

@endmath

....
Convert Formula Images to SVG
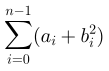
[plantuml,latex_svg,svg]

....

@startlatex

\sum_{i=0}^{n-1} (a_i + b_i^2)

@endlatex

....
|
The error message |
UML Graphics
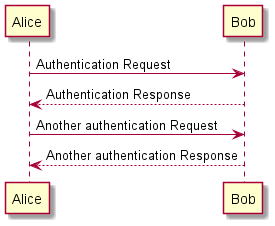
Sequence Diagram
[plantuml,sequence1]

....

Alice -> Bob: Authentication Request

Bob --> Alice: Authentication Response

Alice -> Bob: Another authentication Request

Alice <-- Bob: Another authentication Response

....
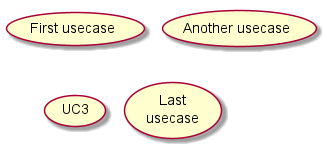
Use Case Diagram
[plantuml,usecase2]

....

@startuml

!pragma layout smetana

(First usecase)

(Another usecase) as (UC2)

usecase UC3

usecase (Last\nusecase) as UC4

@enduml

....
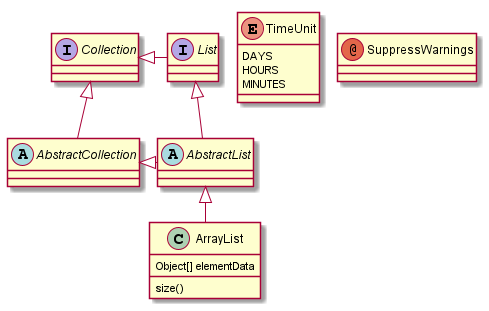
Class Diagram
[plantuml,Class3]

....

@startuml

!pragma layout smetana

abstract class AbstractList

abstract AbstractCollection

interface List

interface Collection

List <|-- AbstractList

Collection <|-- AbstractCollection

Collection <|- List

AbstractCollection <|- AbstractList

AbstractList <|-- ArrayList

class ArrayList {
  Object[] elementData
  size()
}

enum TimeUnit {
  DAYS
  HOURS
  MINUTES
}

annotation SuppressWarnings

@enduml

....
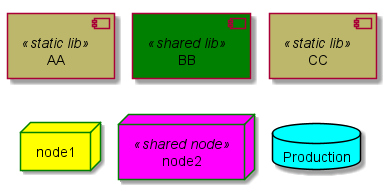
Components Diagram
[plantuml,components]

....

@startuml

!pragma layout smetana

[AA] <<static lib>>

[BB] <<shared lib>>

[CC] <<static lib>>

node node1

node node2 <<shared node>>

database Production

skinparam component {
    backgroundColor<<static lib>> DarkKhaki
    backgroundColor<<shared lib>> Green
    backgroundColor<<shared lib>> Green
}

skinparam node {
    borderColor Green
    backgroundColor Yellow
    backgroundColor<<shared node>> Magenta
}

skinparam databaseBackgroundColor Aqua

@enduml

....
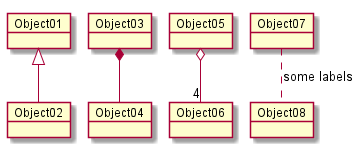
Object Diagram
[plantuml,object]

....

@startuml

!pragma layout smetana

object Object01

object Object02

object Object03

object Object04

object Object05

object Object06

object Object07

object Object08

Object01 <|-- Object02

Object03 *-- Object04

Object05 o-- "4" Object06

Object07 .. Object08 : some labels

@enduml

....
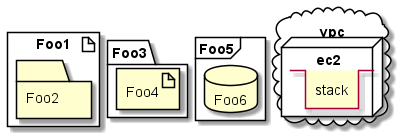
Deployment Diagram
[plantuml,deployment]

....

@startuml

!pragma layout smetana

artifact Foo1 {
  folder Foo2
}

folder Foo3 {
  artifact Foo4
}

frame Foo5 {
  database Foo6
}

cloud vpc {
  node ec2 {
    stack stack
  }
}

@enduml

....
Admonition Blocks
Admonitions are statements that draw the reader’s attention to important information.
The following admonitions are supported by EHANDBOOK:
-
NOTE
-
TIP
-
IMPORTANT
-
CAUTION
-
WARNING === Admonition Paragraph Syntax
-
The label must be uppercase and immediately followed by a colon (
:). -
Separate the label from the text by a single space.
Examples of Admonition Paragraph Syntax
NOTE: This is an example for *Note*.TIP: This is an example for *Tip*.IMPORTANT: This is an example for *Important*.CAUTION: This is an example for *Caution*.WARNING: This is an example for *Warning*.Admonition Block Syntax
[NOTE]

.This is an example for *Admonition Block Syntax*.

====

The following rules apply when creating an admonition block:

* Set the label in an attribute list on a delimited block. The label must be uppercase.
* Admonition styles are commonly used with example blocks.
* Example blocks are delimited by four equal signs (`====`).

====
More Delimited Blocks
Any block can have a title. A block title is defined using a line of text above the block that starts with a dot.
The dot must not be followed by a space. For block images, the title is displayed below the block.
For other blocks, the title is usually displayed above the block.
The following delimited blocks are supported by EHANDBOOK:
-
Sidebar Block
.Sidebar title

****

Example to check sidebar block

****-
Example Block
.Example Block Title

====

Example of an example block

====-
Quote Block
[quote, Albert Einstein, Citation if any]

A person who never made a mistake never tried anything new.
Text Color Support
EHANDBOOK supports text colors in AsciiDoc content using color roles.
Color roles can highlight important information, distinguish different types of content, and improve readability. They can be used with standalone text and text within paragraphs, lists, tables, links, and other supported inline formatting.
EHANDBOOK supports a predefined set of standard AsciiDoc color names. When a supported color role is used, the specified color is applied to the text in the generated output.
Supported Colors
The following standard AsciiDoc color names are supported:
aqua |
black |
blue |
fuchsia |
gray |
green |
lime |
maroon |
navy |
olive |
purple |
red |
silver |
teal |
white |
yellow |
Usage
Apply a color role to text using the following syntax:
[blue]#This text appears in blue#Result: The enclosed text is displayed in blue.
Where:
blue: Specifies the color role.
This text appears in blue: The text to which the color is applied. It is enclosed within # characters.
Color roles can also be used within a paragraph:
This sentence contains [blue]#blue# and [green]#green# text.Result: This sentence contains blue and green text.
Combining Colors with Other Formatting
Bold Text
[red]#Bold red text#Result: The text is displayed in red, and the bold formatting is preserved.
Italic Text
[blue]#Italic blue text#Result: The text is displayed in blue, and the italic formatting is preserved.
Underline Text
[underline red]#Underline red text#Result: The text is displayed in red with underline formatting.
Lists
* [red]#High Priority#
* [green]#Completed#
* [blue]#Information#
Result: The specified colors are applied to the list items.
Table Cells
|===

|Status |Description

|[red]#ERROR#
|An error occurred

|[green]#SUCCESS#
|Operation completed successfully

|[blue]#INFO#
|Informational message

|===
Result: The specified colors are applied to the text in the table cells.
Important Notices
NOTICE
Incomplete container content due to defective or inconsistent input data
Content of the generated EHANDBOOK Container may be missing, if the input data used for generating the container is defective or inconsistent. Affected container contents cannot be displayed or will be displayed incorrectly in the EHANDBOOK-NAVIGATOR. Therefore, always check the log file of the EHANDBOOK Container-Build. Defective or inconsistent input data that have led to errors when converting will be tracked in the log file.
The content consistency is in the responsibility of the data supplier (documentation publisher). We recommend that the data supplier develop a standard procedure for pre-processing the input data outside the EHANDBOOK Container-Build tool chain to ensure the data consistency and to reduce the workload for reviewing the input data. In addition, the pre-processing should be properly documented to ensure transparency.
After generating a new container:
-
Check the entries in the log file of the EHANDBOOK Container-Build indicating defective or inconsistent input data.
-
If necessary, fix the incorrect or inconsistent input data.
-
Re-build the EHANDBOOK Container.
-
Only provide containers for further usage in the EHANDBOOK-NAVIGATOR, if the log file contains no entries, indicating any defective or inconsistent input data.